Pure Mandarin & Honey Jelly Lollies... ❥


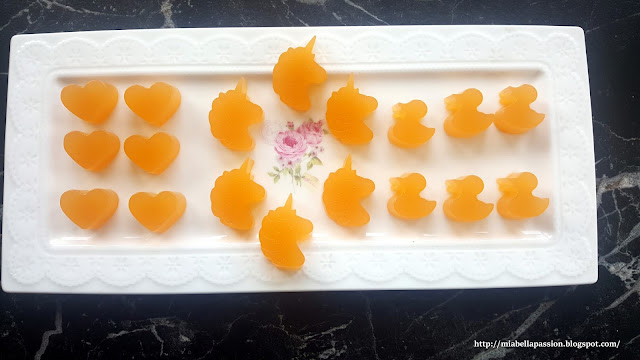
Jelly Lollies
If you're looking for a healthier Halloween, party or everyday treat,
then these easy-to-make jelly lollies are the answer!

These are made with pure freshly picked and then squeezed mandarin juice.
I've also made the jelly lollies with orange juice.

 You need 2 cups of fresh juice.
Strain the juice in a sieve to remove pips and bits.
Place one cup into a small pot with 4 tablespoons of honey.
Make sure the honey is a mild flavour like clover,
as if you use strong honey it will overpower the citrus flavour.

 In a small bowl, sprinkle over the top the other 1 cup of juice and 6 Tablespoons of unflavoured gelatin powder.

 Let the juice slowly soak up the gelatin at its own pace.  DO NOT STIR IT.
This process is called 'bloom'.

Bring the remainder of the juice and honey in the pot to a medium heat .
Add the bloomed gelatin mixture.
Stir with a whisk until dissolved.
Set aside to cool.

 You will need small silicon moulds.

Place the cooled juice mixture in small jug lots to pour into the moulds.
(These are great fun for the kids to make!)

 Place on trays in the fridge overnight to set.


 The pure mandarin and honey jelly lollies keep well in a covered plastic container in the fridge.  And they don't stick together.

I'll be making these in Halloween moulds for sure,
as they are a huge hit with jelly lolly lovers...
As a bonus they are pretty to look at, yum to eat, as well as healthy!

The printable recipe is HERE.

Note: An ingredient conversion chart can be found HERE


GRAB A COFFEE AND POP OVER TO MY GIFT STORES AT

FINE ART AMERICA

REDBUBBLE

SAATCHI ART


#halloween #partyfood #lollies #homemade #jellylollies


Old Metal Tray Upcycle...


Frida Kahlo
I love trays...
I use them practically - for serving 
And to display bits and pieces in the decor.

Often as a low base layer in a vignette.

decoupage
This old aluminium tray is one that I have had for about 20 years.
It certainly has that well worn patina.

I wanted to change it and decided to decoupage this old tray.
Decoupage paper is available from scrapbook and craft stores.
It's a very fine paper like tissue paper.
It comes in many beautiful designs.
 I chose a black and white perfume bottle design.

Isn't such a pretty paper?

And I think it looks fab with the aged silver of the tray.

First clean the tray, 
and then measure and cut the paper to fit.
I left about 5cm of the silver edge exposed.
Mod podge glue the base of the tray.

Press the paper carefully in place.
Smooth out any major unevenness and big wrinkles.  
Layer more glue on top and then place on the second layer of paper.
It leaves a shadow from the bottle pattern as the placement is uneven.
You could just do a  single layer of paper, but I wanted the shadow and a more wrinkled paper effect.

Finally paint a thick layer of modpodge over the top of the paper.
This acts as the final sealer.

Next I wanted to add a flat braided cord to define,
 and create interest around the outer edge of the paper.

Cut cord to fit.
I used to two pieces of cord as I wanted a round edge,
 and a square cut edge opposite each other.

Using a thick line of modpodge press cord on top of it.

decoupage
Leave to dry for 24 hours.

Frida Kahlo
I'm so happy with my very pretty tray, upcycled with decoupage and cord.

Frida Kahlo
It really adds interest with another layer to my black and white "Frida Kahlo' display.

Frida Kahlo artwork by New Zealand artist - Tanya Leef. 

#diy #decoupage #perfumebottles #tray #fridakahlo


Art Quote Love....

Art Quote


#Art  #Art quotes  #theworldisquote #quotestoliveby #life quotes


The ACCIDENTAL Kitchen Fixer Upper!

What part of your home would you love to change?
Mine would be the kitchen.
It is 'Forest Green', butter yellow with accents of bright blue.
Once upon a time it was fashionable!
But I decided new carpet and a new vehicle was of more importance, so that is what I have been saving my pennies for.
Then the accident happened!
It was sort of one of those 'Nana Moments' where after the deed is done you gasp in disbelief and say - 'Heck did I just do that?'
Yip - that is all I will say...
but the outcome was sudden and accidental when I burnt my Forest Green coloured bench top in three places thanks to a red hot pot!
This picture shows one burnt bit.
(I've changed the bench colour here so the burns can be seen in photo).
I claimed insurance for the damage, but really thought that this would not be covered, because it is a galley kitchen that's four and a half metres long.
And that bench top was in one entire piece!
But Lantern Insurance happily covered it...

It was out with the damaged and in with the new!
I chose a black and white marble laminate.
This one is called 'Saint Laurent Marble' by Arborite.
It has a egg shell like texture to it.

The new bench shown here as it's being installed has a square edge and not the wood bullnose edge as before.

I did a little splurge on replacing the sink to a deep butcher style in stainless style, with a nice new shiny tap.
And also replaced the stove top as the old one had a mind of its own regarding temperature control.
I'm blaming that for the ACCIDENT and not the 'maybe Nana Moment'.

And here is my new bench top.
I'm loving the way the top just fits with the older cabinets.

The Top Shop
 I was a bit worried it would look too new.

 But it doesn't!
And even though it is not real granite, I adore it.
It just brings a little more French style to my kitchen.
This accidental fixer-upper is making me very happy!

 There was just one thing that just did not look quite right.
Can you see it?

You guessed it...the fish tiles.

Kitchen Benchtop
 On an angle, it's not so BLUE obvious...

But the closer you get the blue is just a bit bright and WOOHOO.
But it seems colour is in style again and there is a bit of beach-inspired decor happening in my home...
 I do live right by the ocean so the fish had to stay!
I had no intention of changing this kitchen,
but my accidental kitchen fixer upper benchtop is perfect!
Beach Style Decor

SUPER EASY DIY Starfish Wreath...❥

DIY Wreath
It is still officially Winter in New Zealand but I have SPRING fever already!
Maybe that's because this has been a very mild winter,
and the days that are fine seem to be long and sun-filled with little wind at all.
I live in a smaller town, not a city,
so for me, online shopping is so convenient for my favourite city stores.
And the 2 things that it took to make this very simple wreath, 
 were bought that way via Spotlight Online NZ.

The plain cane 30-centimetre wreath was $16.99
and the pack of three starfish were $10.49.

I already had the spray paint in my paint stash (do you have a paint stash?)
but my go to spray paint is as I have said before (because of coverage and no clog nozzles), is Rust-Oleum Universal Paint and primer in one.
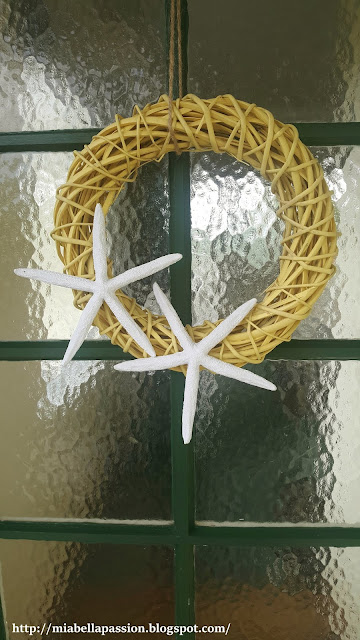
The colour I have used is Matte Citron.

So to make this beach inspired wreath:
Cut off the hanger.
Spray paint the wreath on one side making sure of even colour coverage.
Leave 20 minutes.
'Turn and Spray the other side.
Leave the wreath to dry another hour or overnight.


DIY Wreath
Hot glue on the starfish (I used two)


DIY Wreath
Put the jute string hanger back onto the wreath.
Hang on the Front door using a command hook
 or a small screw-in hook if you have a wood door like me.
How SUPER EASY is that??

DIY Wreath
Now I have a cute beach-inspired wreath for my Front Door.
Popping with gorgeous sunny yellow...
Now I am inspired to refresh the rest of my Front Porch
 - so watch this space for more!


#easydiy #diy #diywreaths #beachinspired #beachy #craft #Beachwreath #starfish


Related Posts Plugin for WordPress, Blogger...