Garlicky Roast Mushrooms


Mushrooms

 Enjoy them on their own as a meat-free meal with a green salad.

Or present them as a sidekick to your next steak meal.

Super quick to whip up, you'll be devouring them in 15 minutes!

Mushrooms

To make it, you will need:

6 portabello medium-size mushrooms.

Mushrooms

Trim the stalks.

Place in a non-stick baking dish.

Mushrooms

Dice 2 cloves of garlic and finely chop 1 tablespoon of fresh thyme sprigs.

Mushrooms

Sprinkle over the tops of the mushrooms.

Mushrooms

Mix 1 tablespoon of balsamic vinegar and 5 Tablespoons of olive oil.

Mushrooms

Drizzle over the mushrooms.

Mushrooms

Grind seasoning of salt and pepper over top and place in a preheated oven heated to 180 degrees Celcius.

Bake for 15 to 20 minutes.

Mushrooms

Serve immediately.

Mushrooms

I served mine as a main meal with a bacon, chicken and vegetable stir fry.

You can enjoy them on their own with toasted sourdough bread for breakfast.

Or they are delicious with steak and coleslaw.

Printable recipe HERE.


#mushrooms #sidedishes #healthyfood


Pretty Pressed Flower Vase

Pressed Flower Craft

Homemade gifts are always wonderful to receive, so here is an idea for gifting.

You can place the pressed (not dried)  flowers onto any glass object.

I have used a preserving jar that has a nice shape with square faces.

Pressed Flower Craft

The first thing you need to do is gather the flowers.

Select various flowers and leaves.

And more than you need in case of any pressing fails.

This does happen!

 This technique is the old-fashioned way where you use a book.

Just like we did when we were kids, before the invention of flower press contraptions.

Pressed Flower Craft

Just place the flowers and leaves between two pieces of newspaper.

Insert in the book.

Do this with all the flowers and leave a gap of about 10 pages between every insertion.

Pressed Flower Craft

Make sure you use an old unwanted book as the moisture may ruin the pages.

Pressed Flower Craft

Put the book in a warm place. 

Pressed Flower Craft

Add more weight by piling more books on top.

Leave for two weeks.

Pressed Flower Craft

Then carefully remove it from the newspaper and place them on a white sheet of paper so you can see what you will have to use.

Pressed Flower Craft

Pressed Flower Craft

On the side of the clean glass vessel, Spread a layer of Mod Podge glue.

Pressed Flower Craft

Place your flower design onto that.

Pressed Flower CraftPressed Flower Craft

Leave to dry.

Then proceed on around the jar or on one face - that is entirely up to you.

Leave to dry once more.

Pressed Flower Craft

Then place a final coating of modpodge on all the flower areas.

Dry for two days.

Pressed Flower Craft

Seal with clear spray sealer.

Dry again.

There is quite a bit of drying time involved, but it really is worth it in the end!

You can use dried flowers, but I find pressing for a few weeks is sufficient.

The glue seals any moisture left in the flowers as does the sealer.

Pressed Flower Craft

To finish I tied a simple thin rope bow at the neck of the jar.

Pressed Flower Craft

Fill your vessel.

I have placed a bunch of garden flowers into my jar.

But you could display dried flowers in the vase.

And tied a simple twine bow at the neck of the jar.

Fun to create, this is a lovely homemade gift, or keep it for yourself.

.

For TLee's art and photographic prints, visit  https://www.saatchiart.com/tlee

Tracey Lee Cassin
Art and Photographic prints @ https://www.saatchiart.com/tlee


#flowercraft #DIYgifts


Cinnamon Xmas Tree Decorations


cinnamon Christmas ornaments

 Delicious aromas of cinnamon permeate the air in your home when you decorate your Christmas tree with a few of these DIY decorations.  

To make about seven decorations 3 inches in diameter all you need is the following:

cinnamon Christmas ornaments

 1 cup of cinnamon

3/4 cup of unsweetened apple sauce plus 1 more heaped Tablespoon.

And 3 Tablespoons of white PVA glue.

cinnamon Christmas ornamentscinnamon Christmas ornaments

Mix all in a bowl and knead well until a dough is formed.

The more you knead, the better the consistency.

Sprinkle more cinnamon on the bench and roll with a rolling pin or press out into a circle that is 1/2 inch thick.

cinnamon Christmas ornaments

Cut the circles using a glass.

Or use shaped cookie cutters.

cinnamon Christmas ornaments

Or press a design into the dough.

I used icing shape cutters.

cinnamon Christmas ornaments

Use a nail or straw to make a hole for the hanger.

cinnamon Christmas ornaments

Slide a spatula under the dough.

cinnamon Christmas ornaments

 Place the ornament gently on a baking paper-covered tray.

Bake in a 180 degrees oven for 20 minutes.

Leave to cool overnight.

cinnamon Christmas ornaments

Add a string or ribbon then hang it on your tree.

Or as in my case my upcycled bat branch from the Halloween decor.

cinnamon Christmas ornaments

I added mini pearl lights to the branch tree and added a single wooden deer ornament.

cinnamon Christmas ornaments

To finish it off, a pair of ceramic white deer standing in the front is surrounded by wooden heart lights.

Simple, but perfect.

cinnamon Christmas ornaments

And oh my!

The cinnamon ornaments make it smell like 

JUST LIKE CHRISTMAS!


Grab a cuppa, and visit

 my Fine Art America gift store


#cinnamondecorations #diychristmas 

#christmasornamnetstomake


'Save the birds' Crystal Hanger

DIY Crystal Hanger 

Have you ever had birds fly into your house windows?

Yip - so have I!

Recently I cleaned my filthy windows and then the very next day, a beautiful wax eye bird was dead on the ground.

The windows simply reflected the native bush behind 'The Barn', and that poor bird thought it was flying into the bush!

So sad.

If you are a long-time follower of Mia Bella Passions, you are probably wondering, bush?

But the 'Mia Bella Passions' garden is Italian and cottage!

So...

I haven't told you about my new beginnings and the happenings over the past two years.

Now's the time to do that.

I made the decision to leave my marriage.

For myself.

Not for anyone else or because of anyone else.

Simply because it was the right thing to do after such a long time of unfixable unhappiness.

The truth is 'Mia Bella Passions' - the house, the gardens and the blog carried me through terrible years of sadness and difficulty.

Not long after the separation, I met 'Him'.

I exhibited paintings in a gallery he was the curator of.

Another creative.

My perfect match.

We became a team.

 I shifted from 'Mia Bella Gardens Homestead' and transitioned to a gypsy-type life travelling, photographing, writing, painting and melding into the amazing small Lakeside community I now live in.

So that is where the bush comes into the picture.

Our creative studios and office are in a big blue barn that backs onto the native New Zealand bush.

To create some reflective light in the windows so those poor birds do not think there is a bush ahead, I have made pretty beaded crystal hangers.

I call them my 'Save the birds' crystal hangers.

Bead Craft
To make a 'Save the birds' crystal hanger, you will need
Glass beads in your choice of colour and shape.
Very thin wire or jewellery wire.
Jewellry Crimps
Jewellery crimps.
Pliers.
A larger bead and crystal for the bottom of the hanger.

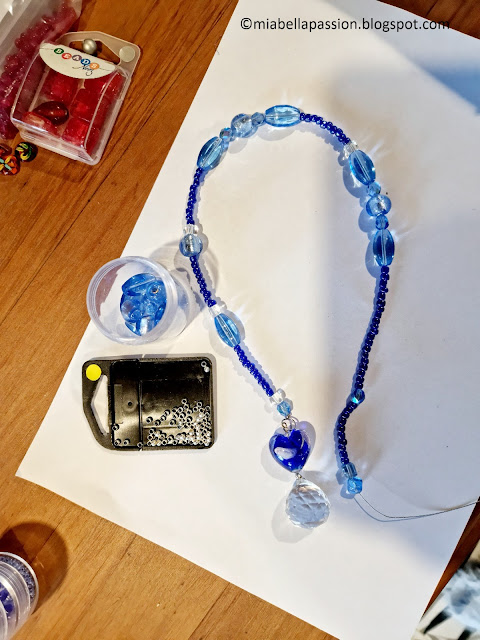
Start by cutting the wire to about 20 inches long (50cm) and attach your bottom crystal through the top hole in it, and twist the wire.
Then add a feature bead.
I used a glass heart which had a hole through the bottom and top.
Bead craft
Add more beads in whatever pattern and size you desire leaving about 3 inches (7.5cm) of wire to create a hanger loop.
 Using a metal crimp place one at the top of the bead chain, and squeeze to flatten with the pliers.

Mia Bella Passions blog
Put another metal crimp on and thread the wire through to create a loop.
I actually put two crimps on for the loop but you only need one.
Squeeze the crimp flat and trim the excess wire.
DIY Crystal Hanger
Hang it in a window where the birds tend to fly into.
The beads create shimmer to distract,
and the crystal creates beautiful rainbow patterns on a sunny day.
This has been the perfect solution that stops the birds flying to the barn office windows.
And they are very pretty too.

#diycraft #beadcraft 


Related Posts Plugin for WordPress, Blogger...