Cherry White Chocolate Blondie

White Chocolate Blondie Recipe

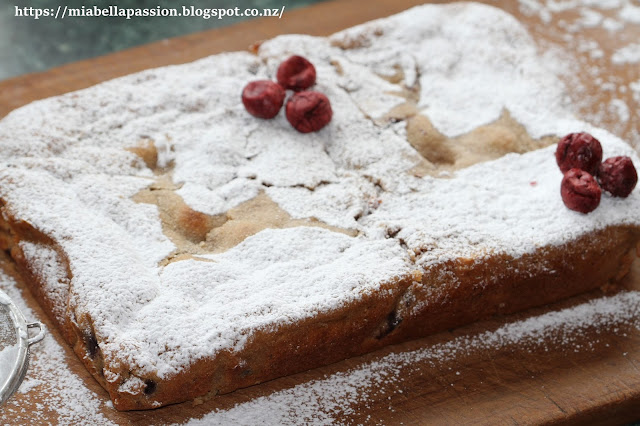
Cherry White Chocolate Blondie is 'Christmas in a MOUTHFUL'!

The flavours induce childhood memories of my mother's Christmas cake.

 Using brown sugar in the mix adds to the deliciousness.

 White Chocolate Blondie Recipe

It's super easy to whip up.

Cherry White Chocolate Blondie

Ingredients:

1 1/2 cups of pitted canned cherries (with juice drained)

2 Tablespoons of brandy

3/4 cup soft butter

1 teaspoon vanilla extract

1 1/2 cups brown sugar

2 eggs 

1/2 cup almond meal

1 1/2 cups plain flour

1 1/2 teaspoons baking powder

3/4 cup white chocolate (chopped)

Powdered icing sugar to dust

Method:

Preheat the oven to 180 Celcius (356 farenheit)

Line a rectangle brownie pan (32 x 18cm/ 12.5 x 7 inch) with baking parchment paper.

In a non-metallic bowl place the drained cherries with the brandy.

Set it aside.

Using electric beaters, mix in a bowl, the butter, brown sugar and vanilla until pale and creamy.

Add the eggs and beat well.

Add the flour and almond meal.

Beat again.

Reserve six cherries to decorate the top of the blondie once baked.

Fold the rest of the cherries and chocolate through the mixture.

Spread into the prepared pan.

Bake 35 minutes or until a skewer comes out with a few crumbs but not wet.

Cool in the pan.

Lift out of pan and when cold, plate, dust the Blondie with powdered icing sugar, and group the cherries in threes on top.


Note: you can omit the brandy if preferred.

White Chocolate Blondie Recipe

 After it's baked and cooled - 
use a Christmas template (sourced from the internet, printed onto paper).

Using scissors, cut the template out.
White Chocolate Blondie Recipe

Place the template in position on the top.

White Chocolate Blondie Recipe

 Sprinkle sieved powdered icing sugar over the top of the Blondie.

White Chocolate Blondie Recipe

 Carefully remove the template.

White Chocolate Blondie Recipe

It is such an easy way to decorate a cake, slice, brownie or blondie... 

White Chocolate Blondie Recipe

Repeat so you have two images on the blondie. 

White Chocolate Blondie Recipe

Position the cherries, cut
and serve with fresh cream or vanilla ice cream.
You will find the printable recipe HERE.
New Zealand Bloggers
For the latest posts JOIN  :) 

#cherry #baking #blondie #christmas #christmasbaking


'Of The Sea' DIY Framed Paper Collage

 Inspired by the sea and abstract Japanese art, the 'Of The Sea' collage is a beautiful coloured or patterned card artistic creation.

DIY Paper art and crafts

It is medium level to make.

These DIY art pieces make great creatively homemade gifts to give.

DIY Paper art and crafts

You can change the colours of the card to your own taste.

If you want to modify my design, you could also add cutouts of fish, starfish, seahorses, plankton, seaweed, and coral.


You will need:

Two pieces of card, plain or patterned for the base.

 The template shapes in complementary colours cut from heavy paper card

Glue

A black Sharpie pen

11 x 14 inch (to fit an 8 x 10 inch collage) frame with an internal mat

DIY Paper art and crafts

Copy the templates to your computer, print A4 size directly onto the coloured paper card of your choice.

Or print on white card, cut them out and draw around them on the patterned card, then cut out.

Otherwise, use a pencil and draw your own freeform shapes on the coloured paper card, and then cut them out.

DIY Paper art and crafts

Cut a base colour card the size of the frame photo insert.

DIY Paper art and crafts

Cut a second background layer slightly shorter to create a horizon and glue the two together.

DIY Paper art and crafts

Arrange your prepared shapes on a card that fits the internal photo size for the frame.

DIY Paper art and crafts

You can outline in black sharpie some of the shapes for more definition.

When you are happy with the positioning, glue each piece in place.

DIY Paper art and craftsDIY Paper art and craftsDIY Paper art and crafts

Use the wave shape as a guide to get the positioning right.

DIY Paper art and crafts

Glue the wave on last.

DIY Paper art and crafts

Then pop in the frame.

The 'Of The Sea' Framed Paper Collage is ready to hang, place on a shelf, or wrap and gift.

Pattern Templates:

Paper art crafts

Paper art crafts

New Zealand Bloggers

For the latest posts JOIN  :) 

#diyart #artprojects #collage #homemadegiftideas #kidsart

#papercraft #paperart

Orange Vanilla Neenish Tarts

Orange Vanilla Neenish Tarts
Neenish Tarts are notorious for being a scandalous taste overload of everything. The original version is sweet and completely over the top!
But even still, eat one, you'll just want more!
Neenish Tarts are a mini-size shortcake pastry base tart, with a sweetened condensed milk-based creamy filling. Topped with a two-tone half side of vanilla icing, the other with chocolate icing.
There are many adaptions. 
Some have a berry jam layer between the shortcake and filling. There's an addition of cinnamon instead of the standard lemon, and other recipes with creamy fillings, similar to French Passterie cream but far less sweet.
Icings morphed into berry and vanilla, or berry chocolate twosomes.
Some people add almond flavours to the pastry.
Orange Vanilla Neenish Tarts
Neenish Tarts are famed in Australia where they originated and also popular in New Zealand, where nearly every bakery serves them.
The Neenish Tart is my mama's favourite sweet treat!
The tart was most unlikely to have been created by famed Australian Mrs Ruby Neenish in 1913, as it has revealed itself as folklore. 
Another theory is they were created by a commercial food company.
Or possibly by Australian outback cooks.
The earliest recipe recorded was in 1924 but called Neenish Cakes.
So all in all, the origin of Neenish Tarts is still a highly disputed topic.
Orange Vanilla Neenish Tarts

Today we are creating my own adaption.
Orange Vanilla Neenish Tarts.
I have created this recipe, especially for Thanksgiving, but they are a divine sweet treat for any absolutely any occasion.
Orange Vanilla Neenish Tarts

The tart shortcake envelops a luscious orange buttercream filling.

There is simple icing on top that is orange and vanilla two-tone.

If you don't have time to bake the shortcake tart bases, you can buy readymade ones. Then mix the orange buttercream filling, pop it in, and ice the tops.
Orange Vanilla Neenish Tarts

Orange Vanilla Neenish Tarts
Orange Neenish Tarts

Neenish Tarts RecipeNeenish Tarts RecipeNeenish Tarts Recipe

Pastry

1 cup plain white flour
1 Tablespoon fine white caster sugar
1 teaspoon finely grated fresh orange zest
1/3 cup soft butter
1 egg yolk
Approximately 1/3 cup cold water
.
Place the flour, sugar and butter in a food processor and pulse to the crumb stage.
Add the rind, egg yolk with half the water and pulse, adding more water if necessary to make a soft ball of dough.
Turn onto a floured board.
Roll out thinly.
Cut round to fit the greased muffin or patty tin holes.
Press to shape.
Prick all over with a fork.
Refrigerate for at least 1/2 an hour.
Bake at 180 Celsius (350 Fahrenheit) for 10 minutes until lightly golden.
Neenish Tarts Recipe
Remove cases from the pans and cool.
Neenish Tarts RecipeNeenish Tarts Recipe

Filling:

In a bowl beat with electric beaters:
1/2 cup of soft butter
1/2 cup powdered icing sugar
When smooth and creamy add:
1/2 cup sweetened condensed milk
4 Tablespoons fresh orange juice
2 teaspoons finely grated fresh orange zest
Beat again until the buttercream is thick, pale and creamy.
Place in refrigerator while tart cases are baking and you prepare the icings.

Vanilla Icing:
In a small bowl make icing with:
1/3 cup powdered icing sugar
1/4 teaspoon vanilla essence
and milk to mix to consistency.

Orange Icing:
In a small bowl make icing with:
1/3 cup powdered icing sugar
1 teaspoon finely grated fresh orange rind
and enough fresh orange juice to mix to consistency.  

Put Together:
Neenish Tarts RecipeNeenish Tarts Recipe
Fill cold tart cases with orange buttercream.
Level tops with a knife.
Ice half the top with vanilla icing and the other half with orange icing.
.

Store in the refrigerator in a sealed container.

Leave one day before eating to give the orange flavours time to infuse and make the sweetness more subtle.

Yield: 14 tarts.

Orange Neenish Tarts Recipe

Printable recipe HERE.


For the latest posts JOIN  :)


#homebaked #minitarts #sweettarts #tartrecipes #homemade

#neenishtarts #neenishtartrecipes


Related Posts Plugin for WordPress, Blogger...