Discover The Beautiful Pitcher Plant Sarracenia Purpurea

How to grow pitcher plants

Sarracenia Purpurea: The Beautiful Pitcher Plant

Sarracenia purpurea, commonly known as the purple pitcher plant, is a captivating carnivorous plant native to North America. With its stunning tubular leaves and unique hunting mechanism, this plant not only adds beauty to the landscape but also plays an essential role in its ecosystem. Let's dive deeper into the fascinating world of Sarracenia purpurea.

How to grow pitcher plants

Physical Characteristics

The purple pitcher plant is easily recognisable by its distinctive pitcher-shaped leaves. These leaves are formed as a modified structure to trap insects, which provide nutrients that are essential for the plant's growth. 

Here are some key features:

· Colour: Its leaves exhibit a rich purplish hue, often speckled with lighter spots or patterns.

The new leaves are a lime green colour.

· Height: The plant can grow between 10 to 40 inches tall.

· Flowers: In spring, Sarracenia purpurea produces beautiful, nodding flowers that can be yellow or purplish in colour.

How to grow pitcher plants

Habitat and Distribution

Sarracenia purpurea is predominantly found in wetlands, such as coastal plains, peat bogs, marshes and meadow wetlands. It thrives in acidic, nutrient-poor soils, where its carnivorous nature gives it an advantage over other plants. 

There are several species of pitcher plants, with the most common types being:

· Sarracenia: Native to North America, these plants have tall, tubular leaves that resemble pitchers.

· Nepenthes: Known as tropical pitcher plants, they feature hanging pitchers and thrive in humid environments.

· Cephalotus: This is a small Australian species known for its unique appearance and compact size.

How to grow pitcher plants

Feeding Mechanism

This unique plant has evolved to attract and trap insects, which are a vital source of nitrogen. The interior of the pitcher contains a slick, waxy surface that makes it difficult for insects to escape once they fall in. The plant then digests its prey using enzymes. Here’s how the process works:

1. Insects are lured by sweet nectar produced at the rim of the pitcher.

2. Once an insect lands on the rim, it often slips into the liquid at the bottom of the pitcher.

3. The plant absorbs nutrients released during the decomposition of the trapped insect.

Conservation Status

Despite its unique adaptations, Sarracenia purpurea faces threats from habitat destruction and climate change. Conservation efforts are essential to protect this remarkable species. Plant enthusiasts and conservationists are working together to preserve their natural habitats and promote awareness about the importance of carnivorous plants.

How to grow pitcher plants

How to Successfully Grow Pitcher Plants

Pitcher plants are fascinating carnivorous plants known for their unique shape and ability to trap and digest insects. These striking plants can enhance any indoor or outdoor garden. If you're eager to add pitcher plants to your collection, this guide will provide you with essential tips for successful growth.

Key Growing Conditions

Light

Pitcher plants prefer bright, indirect sunlight. A location with filtered sunlight, such as near a north or east-facing window, is ideal. If growing outdoors, provide partial shade to prevent leaf burn.

Soil

These plants require well-draining, acidic soil. A mix of sphagnum moss, perlite, and peat moss works wonderfully. Avoid standard potting soil, as it can retain too much moisture and harm the plants.

Water

Use distilled or rainwater to hydrate your pitcher plants. They're sensitive to chemicals found in tap water. Keep the soil moist but not soggy. Ensure that excess water can drain away easily.


Temperature and Humidity

Most pitcher plants thrive in warm, humid environments. Aim for temperatures between 70°F to 90°F (21°C to 32°C) during the day and slightly cooler at night. An environment with 30-60% humidity is optimal; you can increase humidity by misting the plants or using a humidity tray.

Feeding Your Pitcher Plants

Pitcher plants can derive nutrients from the insects they catch. If they're not in an environment where they can trap enough bugs, you may need to feed them. Use dried insects or fish food as supplements. Feed them sparingly, as over-fertilising can harm them.

How to grow pitcher plants

Common Challenges

· Overwatering: Ensure proper drainage.

· Pests: Watch for aphids or spider mites, which can damage your plants.

· Leaf Burn: Too much direct sunlight can scorch leaves.

How to grow pitcher plants

With the right care and conditions, growing pitcher plants can be a rewarding experience. Their unique appearance and fascinating feeding habits make them a great addition to any collection. Research their specific species requirements and watch them flourish!

Get updates about the latest blog posts,
by joining for free HERE.


#pitcherplants #howtogrowpitcherplants  #flycatchingplants 


Almond Raspberry Jam Crumble Bars

 Indulge in the Taste Sensation of Homemade Almond Raspberry Jam Crumble Bars 

Baked Slices

These bars are not only a pleasure to the palate but also an easy way to elevate your morning or afternoon tea time experience with a hint of homemade charm.

Baked Slices

The combination of a buttery shortbread base with jam and almonds, and the sweet yet slightly tart flavour of the jam, melds beautifully with the nutty richness of almonds, creating a symphony of taste that dances on your tongue. 

Whether enjoyed with a steaming cup of tea or a robust coffee, these bars will brighten your morning or offer a delicious pause during your afternoon break.

Baked Slices

Almond Raspberry Jam Crumble Bars

You Will Need:

 1 cup  softened butter

1 cup fine white caster sugar

1 teaspoon almond essence

1/and 1/2 cups plain white flour

1/2 teaspoon baking powder

3/4 cup Raspberry jam

1 cup flaked or slivered almonds


To Make:  

In a large bowl or a cake mixer, cream the butter, sugar and almond essence until fluffy. 

Add the sifted flour and baking powder.  Mix until the dough forms.

Divide the dough into two halves.  Wrap one half in plastic wrap and place in the freezer for 10 minutes.

Press the other half of the dough evenly into a paper-lined 23cm x 23cm  ( 9 x 9 inches) square pan.

Spread the jam over the top of the dough. Sprinkle over the almonds.

Remove the dough from the freezer and crumble it over the top. Press lightly.

Bake at 350°F (175°C) for 30 minutes. 

Let it cool before slicing into bars.

Baked SlicesBaked SlicesBaked Slices

Baked SlicesBaked SlicesBaked Slices  

Adaptations:

This recipe uses raspberry jam, but you can use peach, apricot, blueberry, cherry, strawberry or boysenberry jams instead.
All are delicious!
Baked Slices

Get updates about the latest blog posts,
by joining for free HERE.

#jams #slices #bars #homebaked 


Let's Create A Simple Bee Water Station

DIY Bee Water Station

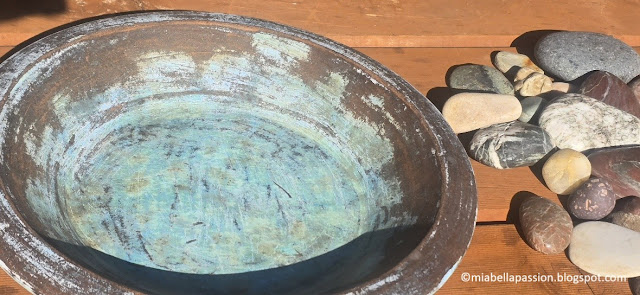
Establishing a bee-friendly habitat is easier than it may seem. In this blog post, we’ll walk you through making a simple dish with stones water station for bees as well as highlighting the advantages it brings to these essential garden pollinators.

DIY Bee Water Station

How To Make A Bee Water Station

Materials Required:

· A shallow bowl or dish (ceramic or metal preferred)

· Small rocks or pebbles

· Clean water

Steps to Create Your Bee Water Station

1. Select a Spot: Look for a sunny area in your garden or patio, ideally shielded from strong winds. A sheltered spot will help bees feel secure while drinking.

2. Prepare Your Dish: Position the shallow dish on the ground or on a stable platform. 

3. Add Pebbles: Fill the bowl with small rocks or pebbles. They will create landing spots for the bees.

4. Fill with Water: Carefully pour clean water into the dish, ensuring the stones remain partially submerged. This setup will allow bees to drink without the fear of deep water. Collected rainwater is preferable.

5. Check Regularly: Monitor the water station regularly, especially on hot summer days. Top it up as needed and refresh stagnant water to maintain cleanliness.

Wash the stones every week or so to remove any algae bloom.

6. Make it pretty: Enhance the dish every few days with flowers if you would like. This helps attract the bees to the water station.

DIY Bee Water StationDIY Bee Water Station

The Advantages of a Bee Water Station

Creating a dedicated source of water for bees holds several significant benefits:

· Access to Water: Bees require water for hydration, particularly during warmer spells. Your station meets this essential need.

· Enhanced Pollination: Well-hydrated bees function more effectively as pollinators, which supports plant and flower growth.

· Encouragement of Local Bee Populations: By establishing a water station, you actively support bee health and diversity, which is crucial for ecological balance.

DIY Bee Water Station

  The Importance of Water for Bees

Bees are often celebrated for their role in pollination. Still, their survival also hinges on access to clean water, which is vital for their daily activities in the hive and overall health and well-being.

DIY Bee Water Station

 What Do Bees Use Water For?

· Temperature Regulation: Bees use water to cool their hives. During hot days, they can collect water and spread it throughout the hive, fanning it with their wings to lower the temperature.

· Food Preparation: Water is essential for diluting honey for feeding larvae. It helps dissolve crystallised honey, making it easier for bees to consume and share.

· Cleansing: Bees require fresh water to clean their bodies and maintain hygiene within the hive. This helps prevent the spread of diseases and parasites that can threaten the bee colony's survival.

· Making Bee Bread: Combining water with nectar and pollen helps bees to create bee bread.

   Bee Bread is a protein-rich food source that is essential for the growth and development of young bees.

DIY Bee Water Station

Setting up a simple dish and stone bee water station is an easy yet impactful way to nurture the bee population while aiding their survival. 

Just by creating a 'Bee Water Station' in your garden,  you will be contributing positively to your local environment and promoting a more sustainable ecosystem for all.

It's also a great activity to teach children responsible and helpful environmental care.

New Zealand Bloggers

Get updates about the latest blog posts,
by joining for free HERE.

#bees #beehealth #beewaterstation #helpingbees

#beefacts