Showing posts with label Porch & Patio. Show all posts

DIY Christmas Gift: Coconut Succulent Hanging Planters


Coconut Succulent Hanging Planters
There is a certain joy in creating your own gifts for giving.

So here is a little DIY Christmas gift inspiration for you.

Coconut Succulent Hangers are a little bit quirky.

A  little bit cute.

They are fabulous for giving this holiday season.

(Or for birthdays, house warming, Mothers day or Fathers Day)

To make two hangers, you will need:

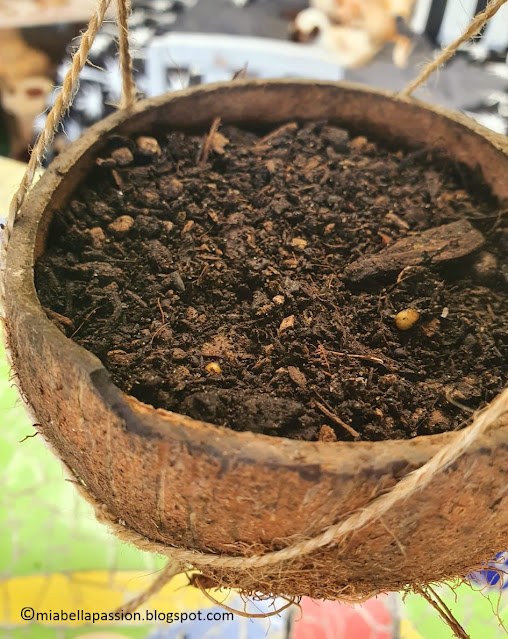
Two small coconuts that have had top 1/4 sawn off and scraped clean of the coconut flesh.

String

Potting mix

Succulents

Succulent plants (cuttings will work fine)

Coconut Hanging Planters

Cut six lengths of string about 53 inches (135cm) long.

Coconut Hanging Planters

Gather three together, fold in half and knot at loop for the hanger at the top.

Coconut Hanging Planters

Then knot 3 inches (8cm) down two strings together.

Coconut Hanging Planters

Then again at 4 inches (10cm) down.

Coconut Hanging Planters

Knot again 4 inches (10cm) down, but split the strings. As shown.

This makes the holder shape for the coconut shell.

Coconut Hanging Planters

Then split knot again about 2 1/2 inches (7cm) down.

Coconut Hanging Planters

Place the coconut shell in place.

Knot all the strings together under the coconut.

Trim ends of the string.

Coconut Hanging Planters

Fill each coconut with potting mix and add water until damp.

Place the succulent cuttings into the potting mix.

Coconut Succulent Hanging Planters

Hang.

I have hung mine under the candle chandelier over my covered deck mosaic table.

Coconut Hanging Planters

Note: There are no drainage holes in the shell, 

so only water when the soil has dried out.

You might also be interested in:

The DIY Seascape  Pallet Painting

(step by step tutorial)

and

The outdoor candelabra DIY


#homemadegifts #diychristmasgifts #DIY


Echeveria sp. 'Green Waterlily'...❥


Let me introduce you to this FABULOUS succulent plant.
It is called 'Green Waterlily' and is from the Echeveria species.
I simply adore the shape of this plant.
It resembles a waterlily, hence its name.
This beautiful succulent forms a compact large rosette.
The leaves are mid green with the tips tinged with pink.
It really is a beautiful addition to pots.
And that is exactly what I have done with it...


planted it in a low squat pot...


 for on the summer outdoor table.

The Green Waterlily is a low maintenance plant that tolerates dry conditions.
All you need to do to keep it healthy is a once-yearly fertilise with slow release type fertiliser.
Water only water once the soil is dry.
Keep in a full sun location and protect it from frosts.

And your happy Echeveria will reward you with interesting spikes of flowers in Spring.


#echeveria #succulents #pottedplants  #droughtresistant


Hanging Succulent Plant....❥

Are you like me?
Do you have a habit of killing the plants in your hanging baskets?  
Try as I might I simply cannot remember to water them.
And that is why I am choosing succulents for my covered deck hanging baskets.

I found this sweet plant at 'Bunnings Garden Centre'.

It's called 'Rhipsalis Cereuscula'.
And isn't it dinky?
Great form.
Great green colour.
Great no kill properties!
The plant was $15.
I already had the hanging basket planter from a previous unsuccessful flower planting.
I freshened up the potting mix and popped this green beauty into the basket. 

As it gets older it will grow new hanging jointed leaf spikes that are shaped like rice.
They will hang down over the sides.
In the Spring this interesting hanging succulent plant produces white to pink satiny flowers.

The secret to growing this plant is to keep it dry in the winter. 
Protect it from frost.
It prefers warm conditions, but I have had mine on my covered deck all winter in the afternoon sun, and it has not minded the coldest mornings of 2 degrees at all.
The recommended position is in the full sun to part shade.
In fact, it is sprouting new growth!


And the little white flowers in Spring are just the cutest!

DIY kokedama
 'Rhipsalis Cereuscula' is also a perfect plant to use with the kokedama no pot technique.
Find out how to make a DIY Kokedama HERE.


#succulents #hangingsucculents #hangingbasketplants #droughtresistantplants


https://track.roeye.co.nz/click?pid=880&offer_id=375


Steampunk Wind Chime...❥

Old spoon love...
that's a bit of a thing for me.
I find these timeworn treasures at the Thrift Store.
And even though they are tarnished and worn there is a certain beauty about them.
But what to do with them?
You can use them in decor vignettes.
Lay spoons in rows or crossed atop a stack of old books with interesting coloured covers.
Or pop them in a vessel.
Perhaps a silver-tone cup, a vintage teacup, or a beautiful crystal glass.
Or why not create a cute wind chime that has a definite steampunk style?
This design is rustic, raw and 'bohemian steampunk'.
Is there even such a word?
The design is carefree, relaxed, and just a little bit unusual.
You can follow my guide or add your own personal touch.
I'm thinking about making another and adding some beautiful hanging crystals.


For this simple project you will need:

6 old silver teaspoons
a wide metal filagree bangle 
(the one I used was 25 centimetre diameter).
thin wire
wirecutters
tape measure
a pencil

1/.  Cut 6 lengths of wire at about 46 centimetres long.  

2/.  Twist the wire tightly around each spoon handle.


3/.  Attach each wired spoon to bangle at approximately every 3.5 to 4 centimetres.
Use a chair to help hold the bangle while you attach the spoons.


4/.  Cut another wire to make a handle.
Use a pencil to add spiral details as shown.
Attach by twisting wire to opposite sides of the bangle.


5/.  Hang and enjoy the beautiful sounds it creates.

Can you imagine what some beautiful crystals will do to this?
Rainbows of light dancing to the spoon chime music!
How beautiful.

You may like to also visit my other creative blog at 


#diy #diywindchimes #spoonwindchimes


Mini Tropical Mountainscape Garden...


Miniature gardening has become quite the thing!
It all started with the classic and much-loved fairy and pixie gardens,
and has evolved from there.
Now you can create gardens themed by dragons, dinosaurs, beach, alpine, tropical jungle or bonsai.
Just select the plants and theme that will suit the position you are placing the container in.
Once you have decided on the theme, and the soil requirements and plants to suit, you just add as much (or as little) accessories as you desire.
A coastal beach scene might have a white sand area with a mini Adirondack deckchair made from iceblock sticks.
A beach sign (also made from iceblock sticks).
Plants could be mini grasses, small-leaved succulents, small natural stones and tiny driftwood pieces.
The main focal tree could be a mini size fig or palm.
You only need to let your imagination have free reign to create any type of themed miniature garden. 

The one I've chosen to create today is a 'Mountainscape'.
To do this I used tropical type plants:
Rocks in various shapes and sizes.
Mini size 'Baby Houseplant' ferns x 2.
Coleus Baby Houseplant.
Tradescantia spathacea Baby Houseplant.
Black Mondo Grass (ophiopogon Black Dragon).
A Flamingo Flower plant (anthurium Andreanum).
Moss.
A round squat type planter.

I filled the container with potting mix.

 
Placed my rocks into position.

Worked out the best placement...

of plants and planted them.
Final touches - a rocky path and moss to cover the soil.

This Mini Mountainscape Garden is now gracing my afternoon sunny covered deck.
I'm thinking in summer I'll be making a beach themed Miniature Garden for this spot and move the Mountainscape inside while it's hot.
And if you are stuck for a school holiday idea for the kids, this is a fab fun activity for them to enjoy. 


#minaturegardens #mountainscape #minigardens


The Front Porch And Potted Plants....❥

Summer arrived and it was time for an update on the front porch...
It's been a few years since any pots have been located here.
The pots needed to be plastic not pottery or terracotta as our summers are so hot, and the plastic pot withholds moisture much better.
I was visiting the K-Mart store and came upon these gorgeous white terracotta pot lookalikes in PLASTIC!
The grade of plastic is very heavy duty.
And the bargain price was just $15 a pot.
The white looks so good.

Potted plants
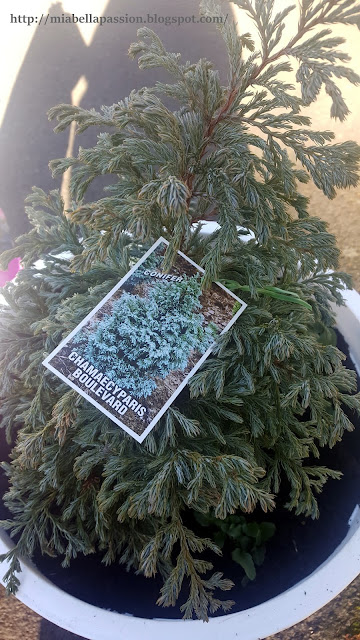
Into the front porch pots, I planted a 'Juniperus chinensis pyramidalis' conifer,

Potted plants
and a 'Chamaecyparis Boulevard' conifer.
They are both reasonably slow growing varieties.
So I am hoping to repot every two years in early Spring with a root prune to keep them a reasonable size of about one to one and a half metres.

Potted Garden Plants
Companion plants were added.
Viola Penny Yellow and Viola Penny White.
Violas are hardy little plants that flower continuously,
 as well as withstanding a semi-shaded position, 
which all of my three covered porches offer any plants that reside on them.
Violas actually provide more flowers per plant than a pansy does!
Feed with liquid or granular fertilizer and you'll get even more flowers!
So this is how early summer on the front porch looked popping with green yellow and white!

Potted Garden Plants
Because these pots looked so good,
and I became besotted with the colour yellow,
I bought another white pot, 
and planted a bright yellow-toned gerbera.
What a wonderful pop of late summer colour now the violas have finished.


Potted Garden Plants
You can see how much the conifers have grown!
And hiding beneath them are new self-seeded viola plants.
And as autumn begins to arrive I can say I have thoroughly enjoyed my white pots
planted with easy-care conifers and plants bursting with the bright colour of yellow!


#violas #conifers #plantsforpots #gerberas #frontporchplants

#pottedplants #gardenpots


Beautiful Impatients Tamarinda...❥

Impatients Tamarinda
What can I say but - "I AM IN LOVE"!
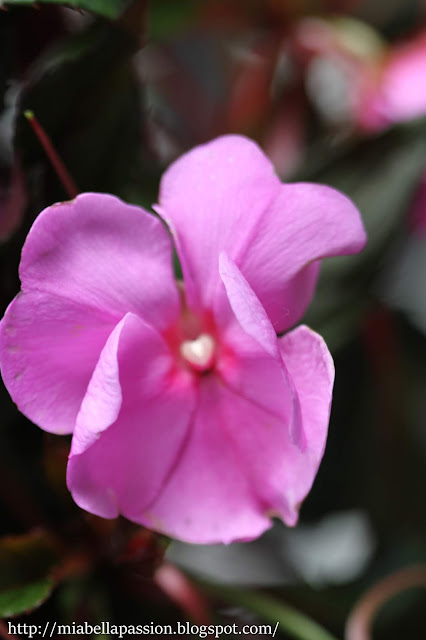
In love with these beautiful Impatients.
Impatients Tamarinda
The flower is stunning, with pops of the most refreshing mauve pink colour.
Impatients Tamarinda
The dark green leaves are veined in a pinky red.
And what is even more perfect is, 
that this Impatients variety thrives in a part shade position.
That means it is ideal for my covered patio, which gets afternoon sun.
The plants' full title is Impatiens Tamarinda by Iconia.
The label describes this plant as a garden jewel and I would have to agree!
The flowers are jewel-like and actually remind me of the colours found in pink agate stone.
Impatients Tamarinda
 The buds unfold just like a tiny rose.
Impatients Tamarinda
 So to grow Impatients Tamarinda successfully:
 *You need to plant them in a part shade position. 
*Soil must be well drained.
*Give the plant frequent watering in the hot, dry summer months.
*Protect from frost in the winter as these plants are very frost tender.
*Liquid feed in summer.
*The plants can also grow in hanging baskets, patio pots as well as garden beds and borders.
Impatients Tamarinda
Success with the above tips means you will be rewarded with:
*Lush green foliage.
*Beautiful curvy star-shaped flowers.
*Flowering continuously throughout the summer season.
Impatients Tamarinda
Impatients Tamarinda  - to add colour to your garden beds, hanging baskets,
and deck plant pots.
Impatients Tamarinda
I'M IN LOVE  - are you?


#Impatients #colourfulplantsforgardensandpots #flowers #flowering plants #summerplants #plantsforpots
#summerpotplants #potplants


Related Posts Plugin for WordPress, Blogger...