DIY Stag Horn Fern Pallet Garden Feature

All about Staghorn Ferns

Staghorn Ferns, they are also known as Platycerium, are a unique and beautiful addition to your home pot plant collection.

But did you know, in the right climate, they can be grown outside in the garden?

More common names they are known by are elkhorn, moose, stag, deer or shield fern.

There are around eighteen different varieties.

These ferns are epiphytic, meaning they naturally grow on trees in tropical forests.  Their roots hold them in place, and they get water and nutrients through their fronds.

Many gardeners recreate their natural habitat by mounting staghorn ferns onto wood.

That is what we will be doing today in the DIY tutorial.

All about Staghorn Ferns

Origin of Staghorn Ferns

Staghorn Ferns originate from tropical regions in Africa, Asia, Australia, and South America. They are named for their uniquely shaped, antler-like fronds that resemble the horns of a stag.

Growing Staghorn Ferns Outside

When growing staghorn ferns outside, it's important to mimic their natural habitat. So choose a spot with dappled shade or filtered sunlight, as direct sunlight can scorch their fronds.

They do not thrive in low light.

 Ensure the mounting board is securely attached to a tree or structure, as staghorn ferns require good support.

I had a staghorn fern-covered pallet by the swimming pool at 'Mia Bella Passions Garden' and it was a showstopper!

But now, since moving to the townhouse, I really wanted to recreate it, in my little garden here.


 DIY Staghorn Fern Garden Feature

DIY Pallet Staghorn Fern Garden Feature

I used a heavy wood pallet as the base structure.

DIY Pallet Staghorn Fern Garden Feature

I painted it a nice dark grey colour.

DIY Pallet Staghorn Fern Garden Feature

As the larger of the ferns had flat backs, they were attached to other pieces of wood with a backing of coconut fibre and then strung with twine to the wood.

DIY Pallet Staghorn Fern Garden Feature

I then nailed them wood to wood onto the pallet.

All  About Staghorn Ferns

The two smaller ferns were placed in coconut fibre nests, with a little soil, and then strung with twine directly to the pallet.

All about Staghorn Ferns

Some people nail the ferns carefully to the wood, but I've had great success using coconut fibre.

DIY Pallet Staghorn Fern Garden Feature
The coconut fibre helps keep the moisture around the fern until they are established on the wood.

The twine eventually decomposes.

The ferns will multiply and naturally spread, eventually covering the entire pallet.

Care of Staghorn Ferns

Provide regular watering, ensuring the fern's root ball is kept moist but not waterlogged. 

Fertilise with a balanced liquid fertiliser once a month during the growing season (Spring and Summer) for healthy growth. 

You can even slip a piece of banana peel under the brown frond shield. It is a great fertiliser.

Staghorn ferns are relatively low-maintenance plants but keep an eye out for pests and diseases and treat accordingly.

Spores will develop on the lower fronds but do not remove them.

The brown dry shield fronds should not be removed as this protects the roots.

In a Bay Of Plenty of New Zealand winter, outdoors, the fern can tolerate a temperature of -2 degrees (28.4F).

I found them quite hardy in an area where direct frost was not on the leaves as they were under a tree canopy.

DIY Pallet Staghorn Fern Garden Feature

With proper care and attention, your mounted staghorn ferns will thrive and bring exotic tropical beauty to your outdoor space.

You can even grow them under a covered deck on a wall.

 For the latest posts JOIN  :)


#staghornferns #gardenferns #mountingstaghornferns


Creme Strawberry Mousse Desserts

Strawberry Mousse recipes

The humble strawberry was first bred from wild strawberry varieties in Brittany, France in the 1750s.

And as some folk have allergies to strawberries, a variety that states 'virtually allergen free' has evolved removing the red colour.

How about that! 

Creamy yellow-white-coloured strawberries!

This new cultivar is called 'Sofar'.

Strawberry Mousse recipes

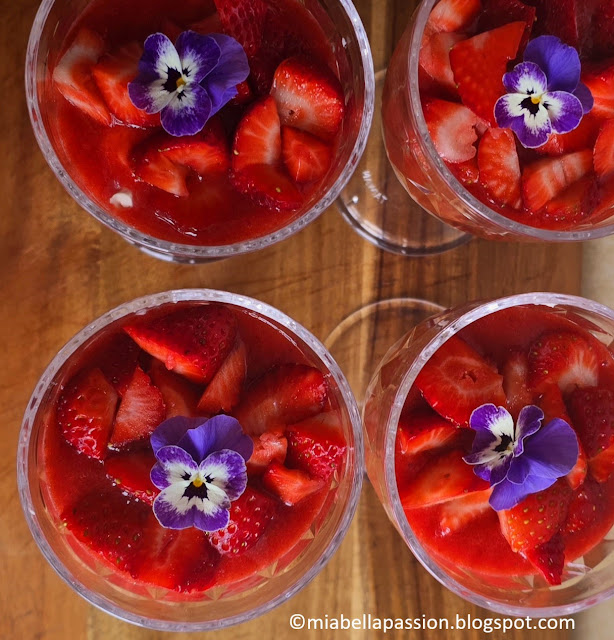
But let's use the deliciously fragrant and tasty red variety to make this 'Creme Strawberry Mousse Dessert'.

The dessert is not overly sweet.

The strawberry flavour sings loudly!

The tartness of the creme fraiche melds with the cream and berry puree to balance the taste buds brilliantly.

It is a fabulous, no-fuss fresh strawberry dessert that is so good you could eat it for breakfast, too!

I'm guilty of that!   :)

Strawberry Mousse recipes

Recipe link is HERE.

Strawberry Mousse recipes
You will need fresh strawberries.
Strawberry Mousse recipes
I use seconds, as we are chopping them up and also pureeing them.
Strawberry Mousse recipes
                    
You then mix the whipped cream and creme fraiche together.Strawberry Mousse recipes
Place half the strawberry puree through the creme mixture.
Strawberry Mousse Recipes
Then mix to blend together.
Strawberry Mousse recipes
Place the creme  
mixture evenly between four large glasses.
Then pour the rest of the puree over the tops.
Strawberry Mousse recipes
Top with more chopped fresh strawberries.
Strawberry Mousse recipes
Place  a garnish of a viola flower on top 
or sprinkle top of desserts with a little more powdered icing sugar.

Creme Strawberry Mousse Desserts

Ingredients:

 3 and a 1/2 cups of hulled chopped fresh 

strawberries

1/2 cup (and extra to serve) powdered icing sugar

1 cup pure cream

1 extra teaspoon of powdered icing sugar

1 cup Creme Fraiche

To Make: 

Hull and dice the strawberries.

Place 2 cups of the diced strawberries into a blender with the icing sugar.

Blitz to a smooth puree until smooth.

Whip the cream with the extra 1 teaspoon of powdered icing sugar until thick(but not to the soft peak stage) and then add the creme fraiche whipping together until thick.

Mix into this mixture, a half a cup of the strawberry puree.

In four tall glasses (I used large plastic wine glasses). 

 Layer evenly between the glasses:

1/. A few diced strawberries in the bottom.

2/. Then the strawberry cream mixture.

3/. The rest of the strawberry puree.

4/. Top with more diced strawberries.

5/. Garnish with a viola flower, or just sprinkle a little more powdered icing sugar over the top.

Refrigerate at least 1 hour before serving.

Yield: Four servings

Note: Desserts can be made a day before serving.

Cover each dessert glass with plastic film, and store them in the refrigerator.

Strawberry Health Benefits

 The Health Benefits of Eating Fresh Strawberries

· High in Vitamin C: Strawberries are a great source of Vitamin C, essential for boosting your immune system and promoting healthy skin.

· Rich in Antioxidants: Strawberries are packed with antioxidants that help reduce inflammation and lower the risk of chronic diseases.

· Good for Heart Health: The high levels of anthocyanins in strawberries have been shown to reduce the risk of heart disease by improving heart health.

· Rich in Fibre: Strawberries are a good source of dietary fibre, which can aid in digestion and help regulate blood sugar levels.

· Low in Calories:  Despite their sweet taste, strawberries are relatively low in calories. Half a cup is around 33 calories.

 For the latest posts JOIN  :)

#strawberryrecipes #strawberryhealthbenefits #strawberrymousse #strawberrymousserecipes


Easy Halloween Spider Light Up Jar

Easy Halloween Crafts
 Gosh, I love creating bits and bobs for the Halloween decor.

And here is yet another effortless creation that looks creepy fabulous!

It only takes minutes to put together.

Don't you just love these easy quick crafts?

You can use any size lidded jar you want.

And as many spiders as you want.

Easy Halloween Crafts

And at night, it shines a spooky spider glow for Halloween.

Place it on your porch or make one for the edge of each step if you have steps.

Easy Halloween Crafts

I have put mine in my sitting room, against the black painted brick fire surround.

It looks fabulous.

Easy Halloween Crafts

Here is how to create your own Halloween Spider Light Up Jar.

Halloween Spider Light Up Jar

All you need is:

A jar with a lid.

Flocked spiders

A string of battery-operated pin lights

Batteries

Bluetak

(Note: you need enough lights to completely fill the jar size you choose to use).

To Make:

Easy Halloween Crafts

Place the lights inside the jar positioning the battery pack at the back behind the lights so it can't be seen.

Make sure you put it with the switch facing up so you can easily access it to turn it on.

Easy Halloween Crafts

Put your spider or spiders in the jar between the lights and the glass of the jar.

I only used one as my flocked spiders were rather large!

Easy Halloween Crafts

On the lid, bluetak a spider or spiders to it.

Screw the lid on the jar.

Switch on the lights at night to illuminate the jar.

Easy Halloween Crafts

And that is it!

Very easy.

Very effective.

And another simple creepy Halloween piece.

Find more HALLOWEEN IDEAS HERE.

For the latest posts JOIN  :) 

#halloween #halloweendecor #diyhalloween


Related Posts Plugin for WordPress, Blogger...