All about Airplants & A quick Shell DIY

Tillandsia Air Plants

  Air plants, also known as Tillandsia, are fascinating plants that don't require soil to grow. 

They absorb moisture and nutrients through their leaves, making them unique and ideal for indoor or outdoor decoration.

1. Light

Air plants prefer bright, indirect light. Place them near a window where they can get sufficient sunlight without being exposed to direct sunlight, which can scorch their leaves.

2. Water

To water your air plants, mist them with a spray bottle 2-3 times a week. 

You can also soak them in room temperature water for 20-30 minutes, then shake off excess water and let them dry upside down to prevent water from pooling in the base of the plant which will cause rot

3. Air Circulation.

Air plants need good air circulation to thrive. Place them in an area with good airflow, such as near a fan or open window. This will prevent mould and rot from developing on the leaves.

4. Temperature

Keep your air plants in a room or outdoors with temperatures between 50-90 degrees Fahrenheit (-1 to 32 degrees Celcius). 

They can tolerate quite broad temperatures.

5. Fertilization

Feed your air plants with a water-soluble orchid or bromeliad fertilizer once a month. Mix the fertilizer at half strength to prevent burning the plant's delicate leaves.

***

With proper care and attention to their specific needs, air plants can thrive and add a touch of nature to your indoor or outdoor spaces. 

My outdoor space has a clear-cover roof over the seating area for year-round use.

(No snow in my part of New Zealand).

Tillandsia Air Plants

It has a tropical feel with the throw cushions, cane couch and tropical gardens.

Tillandsia Air Plants

So I decided an air plant in a shell would be the perfect addition to the outside decor.

It is a very easy DIY to create.

Tillandsia Air PlantsTillandsia Air PlantsTillandsia Air Plants
Tillandsia Air Plants

 DIY An Air Plant Shell

You will need:
A large shell
A small air plant
Coconut fibre

To make:
Soak the plant in water for 20m minutes and drain upside down.
Line the shell with coconut fibre.
Place the air plant in the hole.
Tillandsia Air Plants
Place on your shelf, table, coffee table or outdoor table.
Tillandsia Air Plants


Discover Four Fascinating Varieties of Airplants

1. Tillandsia Ionantha

This is one of the most common varieties of air plants, known for its vibrant green leaves that turn a beautiful shade of red when it blooms. It is a small plant that is perfect for terrariums or small containers.

2. Tillandsia Xerographica

With its striking silvery-grey leaves that curl elegantly, the Tillandsia Xerographica is a popular choice for home decor. It is a larger air plant that can stand alone as a statement piece.

3. Tillandsia Bulbosa

The Tillandsia Bulbosa has a unique shape with its bulbous base and curly tendrils. It thrives in humid environments and adds a whimsical touch to any room.

4. Tillandsia Streptophylla

This air plant has thin, twisting leaves that give it a delicate and wispy appearance. It is a slow-growing plant that produces a stunning flower spike when mature.

There are many more varieties of air plants to explore, each with its own distinct characteristics and charm. 

Whether you're a seasoned airplant enthusiast or a beginner looking to add some greenery to your space, there is a Tillandsia out there for you!


For the latest posts JOIN :)


#tillandsia #airplants #shellplanter


Smokey Slow Cooker Pulled Pork

Smokey Pulled Pork

Let's delve into the delectable world of pulled pork.

It's moist, smokey, and a go-to for a family meal or just as a comfort food.

This recipe is my own adaption to the classic.

Even though it is a long cooking process, it is truly worth every minute of the wait for the final result.

 Leftovers can be placed in portions to freeze for snacks, or sliders, or in a bulk lot to make another meal such as a potato top pie.

Smokey Pulled Pork

Smokey Pulled Pork

Smokey Slow Cooker Pulled Pork

Ingredients:

2.8kg pork (rump is best)

1 large onion (diced)

300ml bottle of smokey BBQ sauce

Sticky Rub:

1/2 cup brown sugar

1 Tablespoon Dijonase mustard

1 teaspoon cumin powder

1 Tablespoon Smokey Paprika powder

1 Teaspoon Salt

Black Pepper to taste

Braising Liquid:

1 cup of apple cider vinegar

Method:

In a slow cooker place half of the diced onion and the apple cider vinegar in the bottom.

Put all the sticky rub ingredients in a bowl and mix well.

If you have a bone in your pork as I did, remove it.

Also, remove the skin leaving a small layer of fat.

Rub the sticky rub all over the pork.

Place in the slow cooker on top of the onion and cider vinegar.

Sprinkle the other half of the onion over the top.

Cook on high for 8 hours, turning meat over halfway.

Drain off the braising liquid leaving about half a cup in the cooker.

Use two forks to pull the pork.

Add the smokey BBQ sauce and toss through the meat.

Smokey Pulled Pork
Mix the brown sugar, mustard, cumin powder, salt and black pepper together. 

 Smokey Pulled Pork
Dice the onion.   
Smokey Pulled Pork
Massage sticky rub on both sides of prepared pork meat.
Place half the onion in the slow cooker. Add the vinegar.
Place the rubbed pork on top.
Sprinkle the rest of the onion over this.
Cook as per recipe instructions.

         Smokey Pulled Pork Smokey Pulled Pork Smokey Pulled Pork
Drain the liquid reserving half a cup. Then pull pork using two forks. Add the Sauce.

Smokey Pulled Pork
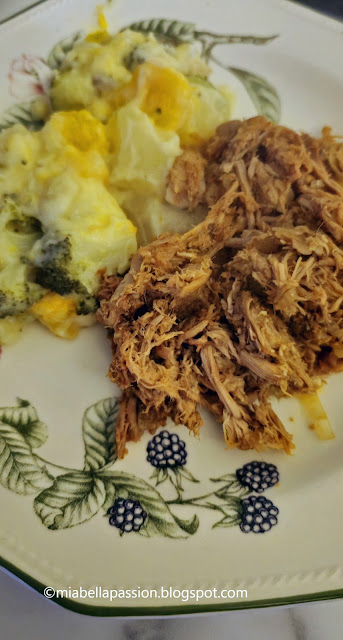
This Smokey Slow Cooker Pulled pork is delicious served with a side of potato and vegetable bake.

This amount of pork serves about 6 people.

For the latest posts JOIN :)


#pulledpork #porkrecipes #smokeymeat #meat


Updating Worn Out Furniture with Paint

Do you have old furniture that has seen better days? 

Instead of throwing it out or donating to charity, why not update it with a coat of paint. 

DIY Painted furniture Ideas

Not only is it a cost-effective option, but it can also provide a new and fresh look to your home's interior status.

DIY Painted furniture Ideas

I had some pieces that were totally worn out.

Pieces I adore but still wanted to incorporate into my eclectic townhouse decor.

A solid wood-varnished coffee table.

An antique lion foot French oval decor table that had been coated in white spray paint and distressed.

A vintage double-tier side trolley table.

And a piano stool with a stained fabric seat.

So I got to work and gave each a clean, light sand.

DIY Painted furniture Ideas

Then applied two coats of White Linen Chalk Paint on the oval table, the piano stool and the base of the coffee table, leaving the tabletop the natural wood.

DIY Painted furniture Ideas

DIY Painted furniture Ideas

DIY Painted furniture Ideas

DIY Painted furniture Ideas

The vintage trolley was already black, so I re-sprayed it with enamel spray paint to freshen it up.

DIY Painted furniture Ideas

I'm so happy with how they turned out!

Beautifully refreshed with a new lease of painterly life!

The trolley table makes a wonderful jewellery and hat stand i the bedroom.

DIY Painted furniture Ideas

DIY Painted furniture Ideas

The piano stool seat was recovered in a gorgeous floral lightweight upholstery fabric. 

DIY Painted furniture Ideas

I finally attained my much-desired dream Cocktail Trolley.

DIY Painted furniture Ideas

The oval table found a place in my large kitchen.

To find out more about chalk paint read on.


What is Chalk Paint?.

Chalk paint is a type of water-based paint that has a matte finish. It can be used on a variety of surfaces, including wood, metal, and even fabrics. 

The paint dries quickly and requires minimal prep work, making it an ideal option if you're looking for a quick and easy update.

Steps to Updating Furniture with Chalk Paint

1. Clean the furniture thoroughly to remove any dirt or debris.

2. If there are any rough spots or imperfections on the surface, sand them down until smooth.

3. Apply a coat of chalk paint using a brush or roller. Be sure to apply the paint evenly and in thin layers to avoid drips.

4. Allow the paint to dry completely before applying a second coat. Depending on the surface and colour, you may need to apply a third coat as well.

5. Once the final coat has dried, you can distress the furniture by sanding down certain areas to create a vintage or rustic look.

6. Apply a coat of clear wax or a sealant to protect the paint and enhance its longevity.

Tips for Success

· Choose the right type and colour of chalk paint for your project.

· Test the paint on a small area of the furniture first to ensure that it adheres properly. Remove all varnish by sanding as this tends to bleed through chalk paint.

· Apply the paint in a well-ventilated area and wear protective gear

· Use a high-quality brush or roller to avoid leaving brush marks or streaks.

· Allow ample drying time between sanding and applying a second coat to prevent the paint from cracking or peeling.

· Use techniques like stencilling or layering colours to create a unique and personalised look.

DIY Painted furniture Ideas

With a little effort and creativity, you can transform your old and outdated furniture into something beautiful and new. 

I opted for solid neutral colours, but I could update some of the pieces at a later date with some stencil detailing.

I'm a rockhound so if you'd like to know how to create the rockhound jar click HERE.

DIY Painted furniture Ideas
Give painted furniture a try and see the difference updating it can make in your home decor.
The stool in the lounge room is fabulous as a footrest, an extra seat or a side table and resides beside the coffee table.

It is a cost-effective way to give old furniture new pizazz.

DIY Coffee Bean Candle Holder

Learn to make the DIY Coffee Lovers Candle Holder.

For the latest posts JOIN :)

#chalkpaint #spraypaint #paintedfurniture #diydecorupdates


Shine Bright Quote

Star Quote

A new digital art quote for you all.
This is inspired by the beautiful song 'Diamonds' sung by Rihanna and written by Sia.
The lyrics are of love...
Find light in the beautiful sea.
You and I choose to be happy.
You and I, 
you and I are like diamonds in the sky.
You're a shooting star I see...

You may like to visit my new page here at Mia Bella Passions:
StellArcobaleno

#digitalart #starquotes #diamonds #diamondstar 


Lamington Butter Snack Balls

Snack Balls

Let's chat before I tell you how to make these delicious Lamington Butter Snack Balls.

What is a lamington?

A lamington is a popular dessert cake, consisting of squares of sponge cake dipped in a layer of thin chocolate icing and then coated in desiccated coconut.

History of Lamingtons

Lamingtons are named after Lord Lamington, who served as Governor of Queensland, Australia from 1896 to 1901. 

The exact origins of the lamington are debated.

However, it is believed lamington cakes were first created by Lord Lamington's chef to use the leftover sponge cake. 

The chef dipped the cut squares of cake in chocolate icing and rolled it in coconut, creating the iconic dessert known today in New Zealand and Australia.

Over the years, lamingtons have become a quintessential Southern Hemisphere treat, enjoyed at cafes, parties, morning and afternoon tea gatherings, and bake sales. They are loved for their delicious combination of flavour and texture.

Many bakers over the years have adapted the original chocolate lamingtons to raspberry and even caramel flavours.

This is my adaption.

Lamington Butter Snack Balls.

Snack Balls
There is no sponge cake involved but the flavour is very Lamington!
Snack BallsSnack Balls

    Snack BallsSnack Balls

Snack Balls

Lamington Butter Snack Balls

Ingredients:

1 cup of finely shredded coconut

1/4 cup of honey 

50g/2oz butter

 2 Tablespoons of raspberry Jam

1/2 cup of dark chocolate melts


Instructions:

1. In a bowl, combine the softened butter and honey until well combined. Then mix in the coconut.

2. With clean wet hands, roll the mixture into small balls, push flat, place a dollop of berry jam in the middle of the coconut mix, and push sides up over it.

 Place them on a baking sheet lined with parchment paper.

Place the tray in the refrigerator until firm.

(about 20 minutes)

3. In a microwave-safe bowl, melt the dark chocolate melts in 30-second intervals, stirring until smooth.

4. Dip each coconut ball into the melted chocolate until fully coated and place them back on the baking sheet.

5. Refrigerate the coconut balls until the chocolate hardens. Store in an airtight container.

Yield: 9 balls

Snack Balls

Lamington Butter Snack Balls are deliciously sweet, nutritious and made with just a few simple ingredients, shredded coconut, honey,  berry jam, and dark chocolate.

Enjoy these delicious and healthy coconut balls as a guilt-free dessert or snack!

Printable recipe HERE.

Home & Garden Blogs

For the latest posts JOIN :)


#snackballs  #lamingtons #homemadesnackballs #coconutrecipes


All About Epipremnum Aureum N' JOY Pothos Pot Plant

Growing Pot Plants

One of the most fun aspects of growing houseplants is watching them grow and thrive. It's incredibly rewarding to see a plant that you've been nurturing start to sprout new leaves or even bloom flowers. The process of caring for a plant and seeing the results of your efforts can be incredibly gratifying.

There are so many different types of plants to choose from.

Each with its unique care requirements, and aesthetic appeal. 

Whether you prefer flowering plants, succulents, or tropical foliage, there is a plant for everyone.

There is also a danger of becoming addicted to this hobby. It's easy to get carried away and finding yourself constantly adding new plants to your collection. Before you know it, your home may start to resemble a jungle!

Despite the potential for addiction, growing houseplants can bring happiness and fulfilment to one's life. It's a hobby that allows you to connect with nature, and create a beautiful and peaceful living environment. 

I admit I may have developed a pot plant addiction!

Epipremnum Aureum N' JOY Pothos plant

Epipremnum Aureum N' Joy Pothos is the latest addition to my collection.

Epipremnum Aureum N' JOY Pothos plant

The Epipremnum Aureum N' Joy Pothos plant, also known as Silver Vine, is a popular houseplant known for its beautiful variegated heart-shaped leaves. 

Originating from the Society Islands of French Polynesia, this plant thrives in a tropical environment in the South Pacific.

Epipremnum Aureum N' JOY Pothos plant

Natural Environment

In its natural habitat, the Epipremnum Aureum N' JOY Pothos can be found climbing trees in the rainforest, where it receives filtered sunlight and high humidity levels. It grows under the canopy of trees, making it an ideal choice for low-light indoor spaces.

It has now naturalized in tropical and sub-tropical forests worldwide. In some countries, it has caused severe ecological damage.

In no light, the plant will lose its variegation completely, but will still survive, which is why it is also known as Devil's Vine.

As a potted plant, it probably won't flower.  The last known spontaneous flowering in cultivation was reported in 1964!

Epipremnum Aureum N' JOY Pothos plant

Caring for the Plant

To care for the Epipremnum Aureum N' Joy Pothos as a pot plant, you should provide well-draining potting soil and a container with drainage holes to prevent overwatering. Water the plant when the top inch of soil feels dry, and allow excess water to drain.

Place the plant in indirect sunlight, as too much direct sunlight can scorch its leaves. You can also mist the leaves occasionally to increase humidity around the plant.

Regularly prune the plant to encourage bushier growth and remove any yellowing or dead leaves. Fertilize the plant every 4-6 weeks during the growing season to promote healthy growth.

Home & Garden Blogs

For the latest posts JOIN :)

Seascape Prints

Seascape Art Prints 
on Fine Art America


#Pothus #houseplants #potplants #pottedplants

#epipremnumaureum #tropicalplants


Related Posts Plugin for WordPress, Blogger...