Showing posts with label Home Decor & Interiors. Show all posts

DIY & Sewing Home Improvements....❥

So the past few weeks have been a little chaotic...
New double glazing and carpet have been put in Mia Bella Passions mansion.
This house is my mansion.
Did you know I have lived here for 30 years?
The double glazing in the living area of the house was a costly but necessary upgrade to make the home warmer for when the next winter comes.
Worth every penny already to be rid of all those old drafty doors and windows.
Gone also is the old forest green carpet and the peach carpet.
It was a half and half carpeted house.

The new carpet is dark black brown.
I love it.
It is so soft and squishy.
So when new things happen...it's nice to upgrade the decor too.

This first thing I did was to paint the bookshelf.

I left the sides wood and also the shelf bases.
It looks so farmhouse.
I'm in love with this too.

Then I sewed a new runner for the coffee table.
This easy sew runner is a breeze to make.
You can find the instructions HERE.

I had a piece of fabric left so I made a new pillow cover.

The forest of trees fabric design just freshens the whole tv room up.

The white guest bedroom headboard was looking a little dirty, so I recovered the headboard with a textured neutral coloured linen.


It was a great improvement,
 as the headboard now matches the linen type fabric on the lamp.

Then I made a new headboard from scratch for the purple bedroom.
(Just get your hardware store to cut a piece of mdf or any other board to size).
I padded the board by stapling an old but still usable puffy mattress topper on to it.
Then I repurposed grey curtain fabric from an old curtain set to cover over the padding.
All using a staple gun.

It was a much-needed addition to this bedroom.
I also have another curtain in the grey spare so that will be used for a future DIY project of recovering the Roman blind in this room.

Love, love, love all my DIY interior decor upgrades.
The total cost to do all this was just $25 for the table runner fabric.
(I purchased this from Spotlight NZ Online)

Because everything else in the decor upgrade was created using saved or stashed materials, and paint I already had.


#diy #upcycling #repurposing #homedecor #sewing 


Old Metal Tray Upcycle...


Frida Kahlo
I love trays...
I use them practically - for serving 
And to display bits and pieces in the decor.

Often as a low base layer in a vignette.

decoupage
This old aluminium tray is one that I have had for about 20 years.
It certainly has that well worn patina.

I wanted to change it and decided to decoupage this old tray.
Decoupage paper is available from scrapbook and craft stores.
It's a very fine paper like tissue paper.
It comes in many beautiful designs.
 I chose a black and white perfume bottle design.

Isn't such a pretty paper?

And I think it looks fab with the aged silver of the tray.

First clean the tray, 
and then measure and cut the paper to fit.
I left about 5cm of the silver edge exposed.
Mod podge glue the base of the tray.

Press the paper carefully in place.
Smooth out any major unevenness and big wrinkles.  
Layer more glue on top and then place on the second layer of paper.
It leaves a shadow from the bottle pattern as the placement is uneven.
You could just do a  single layer of paper, but I wanted the shadow and a more wrinkled paper effect.

Finally paint a thick layer of modpodge over the top of the paper.
This acts as the final sealer.

Next I wanted to add a flat braided cord to define,
 and create interest around the outer edge of the paper.

Cut cord to fit.
I used to two pieces of cord as I wanted a round edge,
 and a square cut edge opposite each other.

Using a thick line of modpodge press cord on top of it.

decoupage
Leave to dry for 24 hours.

Frida Kahlo
I'm so happy with my very pretty tray, upcycled with decoupage and cord.

Frida Kahlo
It really adds interest with another layer to my black and white "Frida Kahlo' display.

Frida Kahlo artwork by New Zealand artist - Tanya Leef. 

#diy #decoupage #perfumebottles #tray #fridakahlo


The ACCIDENTAL Kitchen Fixer Upper!

What part of your home would you love to change?
Mine would be the kitchen.
It is 'Forest Green', butter yellow with accents of bright blue.
Once upon a time it was fashionable!
But I decided new carpet and a new vehicle was of more importance, so that is what I have been saving my pennies for.
Then the accident happened!
It was sort of one of those 'Nana Moments' where after the deed is done you gasp in disbelief and say - 'Heck did I just do that?'
Yip - that is all I will say...
but the outcome was sudden and accidental when I burnt my Forest Green coloured bench top in three places thanks to a red hot pot!
This picture shows one burnt bit.
(I've changed the bench colour here so the burns can be seen in photo).
I claimed insurance for the damage, but really thought that this would not be covered, because it is a galley kitchen that's four and a half metres long.
And that bench top was in one entire piece!
But Lantern Insurance happily covered it...

It was out with the damaged and in with the new!
I chose a black and white marble laminate.
This one is called 'Saint Laurent Marble' by Arborite.
It has a egg shell like texture to it.

The new bench shown here as it's being installed has a square edge and not the wood bullnose edge as before.

I did a little splurge on replacing the sink to a deep butcher style in stainless style, with a nice new shiny tap.
And also replaced the stove top as the old one had a mind of its own regarding temperature control.
I'm blaming that for the ACCIDENT and not the 'maybe Nana Moment'.

And here is my new bench top.
I'm loving the way the top just fits with the older cabinets.

The Top Shop
 I was a bit worried it would look too new.

 But it doesn't!
And even though it is not real granite, I adore it.
It just brings a little more French style to my kitchen.
This accidental fixer-upper is making me very happy!

 There was just one thing that just did not look quite right.
Can you see it?

You guessed it...the fish tiles.

Kitchen Benchtop
 On an angle, it's not so BLUE obvious...

But the closer you get the blue is just a bit bright and WOOHOO.
But it seems colour is in style again and there is a bit of beach-inspired decor happening in my home...
 I do live right by the ocean so the fish had to stay!
I had no intention of changing this kitchen,
but my accidental kitchen fixer upper benchtop is perfect!
Beach Style Decor

Easy To Make Dainty Pom Poms...❥


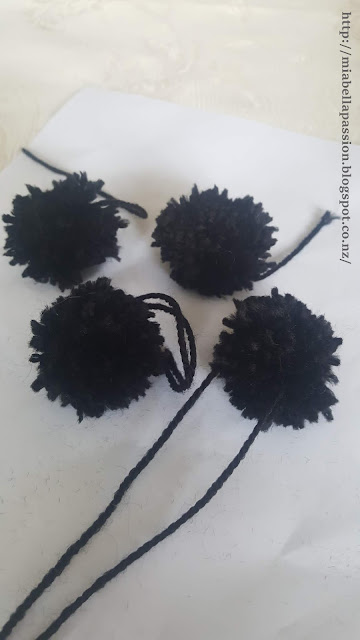
These dainty little pom poms are super cute and simple to create.
I've embellished a cushion with one on each corner, but you can decorate anything with these pompoms.

You will need a fork, wool in the colour of your choice, a wool needle, scissors, and whatever item you will be embellishing with the pompoms.

Pom Poms
Simply wind the wool around the fork.
Remember the more wool you use the fatter the pom pom will be.

 Once you have wound the wool around the fork like this,
cut another piece of wool and thread through the middle prong gap.

Pull the wool as tight as you can and knot.
If you don't tie it tight the pom pom will just fall apart.

  Cut up each side of the fork with small sharp scissors.

Pom Poms
Fluff out and trim.
You will want one long string left to sew you pom pom onto the cushion.

Hand stitch your pom poms onto the cushion.
Lola thinks I put these on this cushion just for her to play with I'm sure!


#homedecor #diy #Cushion #pompoms #embellishments

You might like to also visit:
My store at Fine Art America


❥ Why Not Add Lace?


I seem to be adding embellishments to all sorts of things in my home decor at the moment.
And when I saw this cute little pot for $2 at The Warehouse,
I thought I could make it a little bit more me by adding some lace.
If you have not used modpodge friends then DO try it.
It is so good for gluing and sealing and just has a myriad of craft and diy uses.

For this quick DIY embellishment project
all I needed was: A ceramic container, lace, scissors and some Modpodge.

 The best lace to use is a cotton type.

 If the lace you use has a raw edge, 
use an iron to press it under.

 I'm gluing the lace around the grey edge as this container has a flaw on the white edge.

Glue the lace trim on to the container using the Modpodge.

 Set aside to dry.

Paint a thick layer of Modpodge over the lace. 
 This seals and starches it.

Lace Craft
Now it's a pretty hold all for jewellery in my guest bedroom.


Green bead necklace and earrings from Jewelz By Jodie
https://www.jewelsbyjodie.co.nz/


You might like to also visit:
My store at Fine Art America & Redbubble :)


#diy #lace #embellishments #style


Related Posts Plugin for WordPress, Blogger...