Showing posts with label Yummy Stuff. Show all posts

Peanut Butter Chocolate Chip Snack Balls....❥

There are times when I try to be healthier,
 and try to reign in my obsessive compulsive chocolate addiction.
The trend of health lovers of late is to snack on smooze type health balls...
super healthy little darlings which are made with a date base.
But here's the thing peeps....
I loathe dates.
They are most definitely my most unfavourite flavour.
So I decided to create a snack ball that was more my style...
They are not the healthiest.... 
because apparently dates are healthier!
But my choice is either four chocolate biscuits with my coffee break,
 or two Peanut Butter Chocolate Chip Snack balls.

I figure the snack balls are the healthy winner.
And I REALLY REALLY find them delish.

They last up to two weeks in a sealed container in the fridge.
You'll get about 30 balls.

All you do is mix up in cake mixer or food processor to combine:

1 x 375g Jar peanut butter - crunchy - no added salt.
1/4 cup fine coconut
1/2 cup of dark chocolate chips
And 2 cups fine oats.
Use clean hands shape into balls and place them on tray.
If you wet your hands a little it is easier to shape them.
Place tray in refrigerator for balls to firm for a few hours.

Then transfer to a sealed container.

They tick all the right boxes for my kind of healthy!
Peanut Butter Chocolate Chip Snack Balls are little bites of blissful joy!


#snackballs #peanutbutter #healthy #treats #snacks


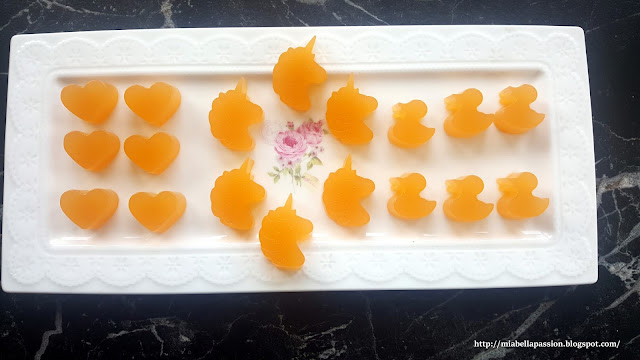
Pure Mandarin & Honey Jelly Lollies... ❥


Jelly Lollies
If you're looking for a healthier Halloween, party or everyday treat,
then these easy-to-make jelly lollies are the answer!

These are made with pure freshly picked and then squeezed mandarin juice.
I've also made the jelly lollies with orange juice.

 You need 2 cups of fresh juice.
Strain the juice in a sieve to remove pips and bits.
Place one cup into a small pot with 4 tablespoons of honey.
Make sure the honey is a mild flavour like clover,
as if you use strong honey it will overpower the citrus flavour.

 In a small bowl, sprinkle over the top the other 1 cup of juice and 6 Tablespoons of unflavoured gelatin powder.

 Let the juice slowly soak up the gelatin at its own pace.  DO NOT STIR IT.
This process is called 'bloom'.

Bring the remainder of the juice and honey in the pot to a medium heat .
Add the bloomed gelatin mixture.
Stir with a whisk until dissolved.
Set aside to cool.

 You will need small silicon moulds.

Place the cooled juice mixture in small jug lots to pour into the moulds.
(These are great fun for the kids to make!)

 Place on trays in the fridge overnight to set.


 The pure mandarin and honey jelly lollies keep well in a covered plastic container in the fridge.  And they don't stick together.

I'll be making these in Halloween moulds for sure,
as they are a huge hit with jelly lolly lovers...
As a bonus they are pretty to look at, yum to eat, as well as healthy!

The printable recipe is HERE.

Note: An ingredient conversion chart can be found HERE


GRAB A COFFEE AND POP OVER TO MY GIFT STORES AT

FINE ART AMERICA

REDBUBBLE

SAATCHI ART


#halloween #partyfood #lollies #homemade #jellylollies


Jaffa Cream Chocolates....❥

Jaffa Chocolates
Tempt your taste buds with these delicious Ganache chocolates.
Easy to make.
The perfect quick gift
or 
just a 'Why Not' treat.

To Make:
Melt over a low heat in a pot:

 225 gram packet of dark chocolate (or melts)

1/3 cup cream

and the juice of 1 fresh orange.
Leave to sit in pot til firm.
you want the mixture to hold it's shape when swirled.

Place in piping bag 

with a Wilton 2D nozzle.
And pipe swirls onto baking paper lined tray or directly into mini cases as I have done.

Place a plain roasted almond on top.  '

Or a sliver of orange rind.

That's it.
Leave in fridge until firm and serve.
These are best kept in an airtight container in the refrigerator.
To eat: Pop in mouth and enjoy that buttery chocolate sensation.

Jaffa Chocolates
You'll find a printable recipe HERE

You might like to also visit:
My store at Fine Art America


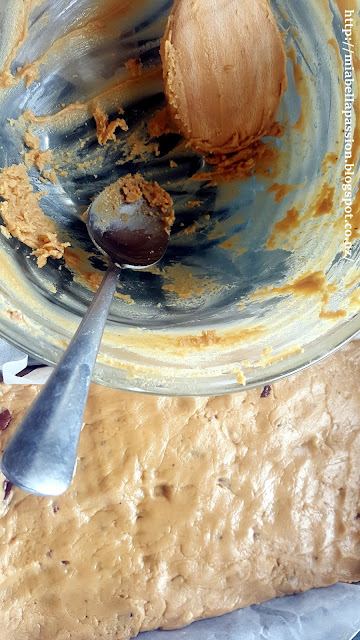
Microwave Russian Pecan Fudge ❥


Russian Fudge is my favourite kind of fudge.
But I have always found it to be the most tedious to make.
And the caramel will always catch on the bottom of the pot no matter how low the heat.
That is why I am sharing the easiest Russian Fudge recipe with y'all today.
It's so simple.
AND there is no burning on the bottom of the pot, 
because it's completely microwave made!
I have added toasted pecans to my recipe - but if nuts are not for you leave them out.

To make the fudge...
you will need a can of condensed milk, brown sugar, butter, pecans and white chocolate.
You can find the printable recipe HERE.

Melt the butter -
Add the sugar and condensed milk and cook for five 2 minute increments stirring each time.

This is what it look like after 6 minutes...
Golden beautiful - and NO burny bits!

After the last 2 minutes - remove from microwave and add the pecans and white chocolate.

Pecan Russian Fudge
Quickly mix with a wooden spoon and spread into a baking paper lined slice pan.

Pecan Russian Fudge
It's so delicious.
I always 'snapchat' the family, and they all appear for a share.

Pecan Russian Fudge
Once you have made Russian fudge in the microwave, 
I doubt you'll return to the pot-cooked version...
it is that GOOD!

Recipe: HERE

#sweets #fudge #Russianfudge #microwavecooking #homemade

You might like to also visit:
My store at Fine Art America & Redbubble


The CUTEST Rabbit Cake Ever...

Well ain't this the CUTEST rabbit cake you ever did see?
There is a bit of fiddly prep,
but actually it is not too hard to create.
This cake was for a 3 year old girls birthday.
But would it not be the most fun cake to serve to family and friends this EASTER?

The first step in the week before making the cake,
you need to make the rabbit ears.

I just free hand drew the ear shape, 
but on the internet there are many free rabbit ear templates.
The ears were large at about 25 cm tall.

Then I cut out a smaller set of pink for the inner layer.
These were 15cm tall.

Then I decorated them.
The final step was to attach them to the iceblock stick with glue.

And this is the final result.

For the cake - I whipped up two packets of ready mix Strawberry cake.

These were baked in two large 23cm by 8cm deep cake pans.
Once cake is cold, remove it from pan and slice off tops so it's flat.
These cake slices can be frozen to use in trifle  type desserts.
Then ice the bottom cake layer (cut side up) with vanilla frosting, 
Top with other cake layer - with the cut side facing down to the frosting.

Place a thin layer of frosting over the entire cake.
Roll out white ready roll icing and cover the cake.

Then place the ears on top.

Make a pink strawberry frosting and create little swirls around the ears.
Decorate with edible paper flowers.
On the front pipe two eyes and a little pink nose.

To decorate the back of the cake place more pink icing swirls and more paper flowers.

It was a huge HOPPY hit at this Birthday Party...

And I think it would be as equally fabulous as a Easter cake.

The Rabbit cake was almost as big as the Birthday Girl!!

Pre Packet cake mix is a real timesaver...
and you know what?
It was pretty delicious too!


#rabbitcake #childrensbirthdaycakes #cakedecorating


Nutella Berry Tart...


I'm a Nutella lover...
I'm a berry lover...
And I'm a pastry lover.
And this very simple to make Nutella Berry Tart is a fabulous combination of all those taste bud tantalisers,
as well as being a fitting farewell to the end
 of our Southern Hemisphere summer berry season.
It's just so easy to make, I am not even going to create a printable recipe!

All you do is roll out  (or use ready-rolled) flaky pastry.
(400 gram block used here)
Roll into a rectangle about 23 by about 30cm in size.

Prick it all over with a fork.

Bake for 20 minutes in a hot 200 degree Celcius oven until golden.
It will be puffy.

So when you remove it from the oven cut a few slits and gently press the pastry flat using a paper towel.

Cool the pastry until just warm.
Remove the lid of a small 220 gram jar of Nutella spread.
Microwave for 30 seconds on high.

Mix with a knife in the jar and then spread over the pastry base.
Add chopped strawberries.

Top with raspberries.

Sprinkle over 70 grams of roasted chopped and shelled hazelnuts.

Then finally drizzle with 220 grams of melted white chocolate.
And a sprinkle of thyme leaves.

Nutella
Enjoy warm or eat cold.
Nutella, berries, nuts and pastry = Nom NOM Nom!


#nutella #dessert #homemade #berry #pastry


Related Posts Plugin for WordPress, Blogger...