Upcycled Frame Jewellery Display


Upcycled Frames

   Displaying vintage brooches and necklaces in an old picture or mirror frame is a fun and creative way to showcase these beautiful timeless accessories while adding a unique touch to your bedroom or dressing room decor.

Start by sourcing an old frame in a size and style you like. 

Look for frames with intricate designs or interesting textures to add character to your display.

Upcycled Frames

I found a lovely vintage French-style mirror via a second-hand seller on Facebook.

The top detail had been broken, but it was a simple fix to sand the sharp edge and round it off.

Upcycled Frames

I didn't want the mirror for this project, so I removed the back of the frame and took the mirror out.

Tracing the shape onto cardboard for a new backing.

Upcycled Frames

As my bedroom has a silver colour palette, I thoroughly cleaned the detail on the mirror frame and spray-painted it.

Upcycled Frames

I choose a shiny mirror silver paint.

Upcycled Frames

Once dry, I cut a piece of wadding to fit the shape.

Upcycled Frames

Then I covered the wadding with a beautiful grey velvet fabric.

 Hot glue was used to attach the fabric to the cardboard with the wadding in between.

Upcycled Frames

Next, it was a matter of reassembling the wadded fabric into the frame. I used PVA glue to attach to the frame.

Leaving it overnight to dry.

Upcycled Frames

I added a hanging attachment.

Vintage Jewellery

Now for the fun part.

Let's add the jewellery.

Vintage Jewellery

You can poke the point bar of the brooch into the fabric wadding, or you can pin the brooches on using pearl head sewing pins.

Upcycled Frames

Consider grouping brooches by colour, size, or theme to create a visually appealing arrangement.

Some of my brooches and necklaces are family heirlooms.

Some were sourced from thrift stores.

One brooch was a gift to me when I was 8 years old from an elderly lady my Mama was a caregiver for.

Upcycled Frames

And yes, in case you are wondering, they do get worn!

What I love about the Upcycled Frame Jewellery Display, is at a glance, I can choose the brooch or necklace of the day to compliment my outfit.

You might also like to learn how to make the

Upcycled Antique Frame Mood Board.

For the latest posts JOIN :)


 Visit my 'Saatchi Art & Photography' store 

Original art store HERE

#upcycling #vintagejewellery #oldjewels #upcycledframes #diyideas


Delicious Spicy Pea Soup

Easy Soup recipes

We are making a delicious creamy and spicy pea soup today.

It is a speedy meal to prepare.

Perfect for those busy weekdays when you can't be bothered making a time-consuming meal.

My lovely friend Rosemary brought this to share at a recent Mid-Winter Christmas Dinner party.

I immediately wanted the recipe.

And to be honest, I am not a huge fan of peas.

But this is one way I can enjoy them and their amazing nutrients.

This pea hater is now a pea lover!


Spicy Pea Soup

1 kg bag of frozen peas 1 onion 1 heaped Tablespoon Garlic Butter 4 cups vegetable or chicken stock I x 400gm can coconut milk 2 tablespoons of curry paste ( Pataks or Massaman)

Salt to taste Chop onion, and soften in butter until clear.

Add the curry paste and stir until fragrant. Add stock and peas.

Simmer 15-20 mins.

Cool for 10 minutes. Blitz with a stick blender.

Taste and adjust salt.

Add the coconut milk

(if too thick add a little more water).  

Reheat and serve with crusty bread.

Yield: 10 servings


Easy Soup recipesEasy Soup recipes

Easy Soup recipes

Easy Soup recipes

Printable recipe HERE.

Easy Soup recipes

Green Peas: The Unsung Health Heroes

Green peas, often overlooked in favour of more popular vegetables, pack a powerful nutritional punch that can benefit your health in numerous ways.

Rich in Vitamins and Minerals

Green peas are a great source of vitamin K, essential for blood clotting and bone health. They also contain vitamin C, a powerful antioxidant that boosts your immune system, and vitamin A, important for eye health.

High in Fibre

Green peas are a good source of dietary fibre, which can aid in digestion, help regulate blood sugar levels, and promote a feeling of fullness to aid in weight management.

Protein Powerhouse

Surprisingly, green peas are also a good source of plant-based protein, making them an excellent choice for vegetarians and vegans looking to meet their protein needs.

Antioxidant Properties

Green peas contain various antioxidants, such as flavonoids and carotenoids, which help to reduce inflammation.

Easy to Incorporate into Your Diet

Whether you enjoy them fresh, frozen, or canned, green peas are a versatile vegetable that can be added to soups, salads, stir-fries, and more to boost the nutritional content of your meals.

Next time you're planning your meals, remember the humble green pea and all the health benefits it has to offer!

For the latest posts JOIN  :)

#soup #souprecipes #easytomakesoups #peasoup


DIY Teddy Bear Clay Craft

Airdry clay craft 

This super cute airdry clay teddy bear is not too difficult to create for a special ornament to gift, or you can use these 'how to' instructions to make it out of modeling fondant for a cake topper.

But today we are making it using the air dry clay.

On a tabletop or a craft cutting board roll a ball of clay that is about 5cm (2 inches) in size to an oval shape. 

Airdry clay craft

For the legs and arms, make four  3cm (1 1/2 inch) small sausages.

Airdry clay craft

Squash the ends (this is where they attach to the body).

Airdry clay craft

Attach by blending underneath with a flat edge tool and at the back of the bear's body, then create a fur effect using a pointed tool.

Do the same to make two arms.

Attach the legs to the body blending the flat part into the base of the body clay.

Airdry clay craft

Attach the arms in the same way.

Airdry clay craft

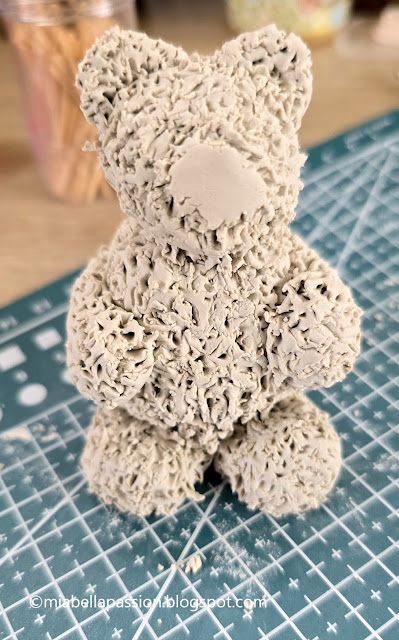
Use a pointed tool to rough up the clay to resemble fur.

You can manipulate the bear to sit flat and into the sitting shape you want.

Airdry clay craftAirdry clay craft

To make the head roll a 2.5cm (1 inch) ball, a smaller one for the nose area, and two smaller ones for the ears.

Squash the balls, and cut out two ear shapes.

(see photograph above)

Position nose plate, and ears on the head, and attach blending clay to meld.

        Airdry clay craft Airdry clay craft

Attach the head to the body using a toothpick pushing into the centre of the body to support it.

Airdry clay craft

Blend the clay around the neck area.

And use the pointed tool to create fur to blend the join.

(Take particular attention when melding the neck to the body, as when mine dried the clay shrunk (for lack of melding) and left a gap between the body and head, but reattachment using PVA glue fixed it fine).

The photo above is what your bear should look like.

Airdry clay craft

Make little dots for the eyes and nose. I had black clay for this, but you can use natural and paint them later when it's dry.

Attach using a pointed tool.

Leave to dry.

(It takes about five days).

Once the teddy is completely dry, you can paint it any colour you want.

Touch up the nose and eyes with black paint if necessary.

Airdry clay craft

When the paint is dry, seal the entire bear with a clear sealer.

I used a clearcoat spray sealer on the naturally coloured clay.

Airdry clay craft

I hope all the photographs in this tutorial help you create your own sweet teddy bear.  :)

For the latest posts JOIN  :)


#airdyclaycraft #fondantcaketopper #teddybearcraft