Blackboard Christmas Tree Art....❥

DIY Christmas decorations

This must be the easiest decoration to create for your Christmas Decor.
And its also a fun one for the kids to make too.
DIY Christmas decorations
 All you need is a dollar store blackboard and some chalk.
DIY Christmas decorations
Draw a Christmas tree in chalk.
DIY Christmas decorations
You can also print Christmasy words around the outside of the tree if you like.
NZ Lifestyle Bloggers
For updates about the latest blog posts,
you can join for free HERE.

#christmasdecor #christmascrafts #cristmaskidscrafts

Berry Button Gift Tags...❥

Create the ideal adornment for your gifts, with easy-to-make 'Berry Button Gift Tags'. DIY Christmas Gift Tags
They are super cheery!
DIY Christmas Gift Tags
 All you need to create them are:
Green felt
Some dollar store ready-made tags - plain or glittered.
Buttons in 3 sizes. 
Craft glue.
DIY Christmas Gift Tags
Cut free form green leaves.
DIY Christmas Gift Tags
Glue leaves and buttons on to tag as shown.
DIY Christmas Gift Tags
Add a tie cord.
Once dry, it's ready to add to your gift!
Get updates about the latest blog posts,
by joining for free HERE.

#christmas #christmasgifttags #christmascraft #mistletoe #buttoncraft

A Snowy Luminary...❥

Christmas Craft Ideas
DIY a some gorgeous festive bling.
Or make one to gift and share the love of Christmas.
Christmas Craft Ideas
All you need to make these Snowy Luminaries are:
A Clear jar with an opening big enough to place a small tealight or candle.
(I used one that was 13cm tall , with a opening that is 7cm wide)

A small bag of Epsom salts.
Christmas Craft Ideas
(Epsom Salts makes fabulous fake snow.)

Matt Mod Podge glue.

Some decorations for the neck of the jar.
(rope, Christmas ribbon, faux berries & pine or anything Chjristmasy)

To make:
Christmas Craft Ideas
Coat the bottom 3/4 of the jar in a Mod Podge glue.
Christmas Craft Ideas
 Roll in the Epsom Salts
Christmas Craft Ideas
Press the salts onto the glue.
Set aside to dry.
Then paint a second layer of Mod Podge over the Epsom Salts to set it to the jar.
Set aside to dry.
DIY Christmas Luminaries
Bind the jar neck with the twine.
Christmas Craft Ideas
DIY Christmas Luminaries
Add your embellishments. 

I used:
natural twine for the neck of the jar
some faux berries
and some gold plastic leaves.

DIY Christmas Crafts
I always save bits from old decorations for crafting new things.
DIY Christmas Luminaries
 And a tea light candle.
I wish you could smell these ones...
OH MY, they are so deliciously fragrant!
Handmade by Living Light - Golden Bay - New Zealand
https://www.livinglightcandles.co.nz/

Tips for Creating the Perfect Luminaries

· Experiment with different sizes and shapes of jars for unique designs.

Display them in groups or individually.

· For safety, always supervise lit candles and keep them away from flammable materials.

Place the luminary out of reach of small children and animals.

DIY Christmas Luminaries
Place the Snowy Luminary in your Christmas home decor and light it at night.
And you will have your own DIY Festive Bling.
DIY Christmas Luminaries
Or gift to someone special this Christmas.

For updates about the latest blog posts,
you can join for free HERE.

#christmas #christmascraft #candles #luminary

Mock Christmas Pressie Stack...❥

DIY Christmas decor ideas
How cute are these little mock Christmas-themed parcels?
And they are perfect for added fun to the Christmas decor.

To make them you will need:
A selection of boxes in various sizes to stack
Various Christmas themed paper to wrap the boxes
Craft Glue
Sellotape
Embellishments: stickers or images from old Christmas Cards
 or coloured in stamp designs
coloured string
DIY Christmas decor ideas
Wrap each box in chosen paper.
DIY Christmas decor ideas
Embellish as desired.
DIY Christmas decor ideas
Stack and place on a sideboard, bookshelf, or coffee table.
Add a 'Cute Christmas Bird' to the top.
Christmas Craft Ideas
The tutorial to make the birds is HERE.

NZ Lifestyle Bloggers
For updates about the latest blog posts,
you can join for free HERE.

#christmasdecorating #christmascrafts

Cute Christmas Birds...❥

Paper crafts
Well, y'all know I'm kinda fond of paper crafts, 
and these sweet wee paper birds are so very easy to craft.
Paper crafts
The kids will love to make them for decorating the mantel or bookshelf for sure!
Paper crafts
You'll need:
sturdy paper or card to make two bird shapes.
A bird template.
Two paper clips for each bird's feet.
A quick-drying craft glue.
First, you will need to print a bird template and cut it out.
Paper crafts
I just used this free one that I found on Pinterest.
You can choose any bird shape you like.
I printed this in a 4x6 size.
Paper crafts
Use the template to draw an outline on paper of your choice.
Use a double layer with the patterns facing each other.
Draw around the template and then cut the double paper.
Because these are for the Christmas decor, 
I have used Christmas-themed paper.
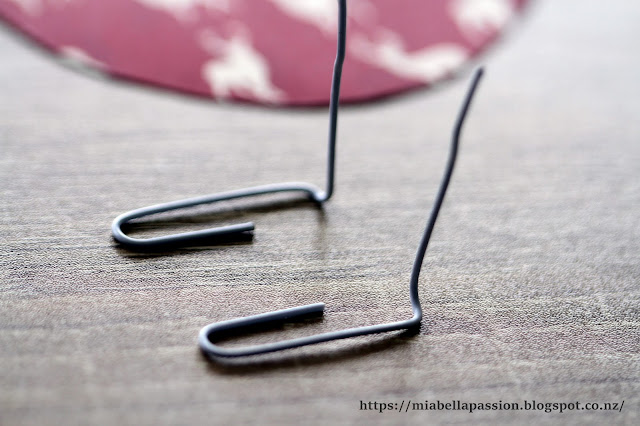
Bend two paper clips per bird for the feet as shown.
Paper crafts
 Glue the two sides together using a big dollop of glue at the bottom of the bird's tummy to hold the paper clips.
Paper crafts
 Insert the paper clips and hold the two layers together for a minute while the glue sets.
You will have to manipulate the feet a bit so the paper bird will stand on its own.
Paper crafts
Use for your Christmas decor... 

Note:
Save this paper craft idea for Spring and make pretty Spring paper birds.

NZ Lifestyle Bloggers
For updates about the latest blog posts,
you can join for free HERE.

#papercraft #birdcraft #paperbirds #nzbloggers 
#christmascrafts

Thrift Shop Wood Bowl Makeover... ❥

DIY Upcycled Gift Ideas
I love paint  in all of it's glorious forms.
But I particularly like spray paint.
Rust-oleum primer and paint in one can is just the best.
No clog nozzle.
Perfect coverage every time.
DIY Upcycled Gift Ideas
 Here I have a dollar find from the thrift store.
Looking a bit sad and much past its best.
DIY Upcycled Gift Ideas
 Two coats of spray paint later...
with a wait of 20 minutes between layers.
Turn and paint the inside of the bowl using same procedure.
DIY Upcycled Gift Ideas
And once the paint dries this colour - which is Robins Egg
is a wonderful matt finish.
I love it because it is just like a chalk paint patina.
DIY Upcycled Gift Ideas
Upcycled gifts are a favourite thing to create...
DIY Upcycled Gift Ideas
 And with Christmas coming it's time to think about DIY and homemade gifts...
DIY Upcycled Gift Ideas
And I believe whoever gets gifted this gorgeous upcycled bowl will adore it!
As it is so pretty and a perfect jewellery keeper.

NZ Lifestyle Bloggers
For updates about the latest blog posts,
you can join for free HERE.

#upcycling #spraypaint #homemadegifts