Upcycled Antique Frame Mood Board

Dating old frames

This beautiful old frame found me.

I love how things appear for you when they are meant to be yours!

The first thing I thought about upcycling it into was a mood board for my studio's little quotes and art inspirations.

But first, let's have a chat about this frame.

This is where I might need your help!

Is it Victorian? 19th century? Faux old? 

French? Replica?

Old frames

I spent many hours researching on Google to no avail.

There were many much more ornately decorated and gold-gilded ones in similar styles.  

But nothing quite the same as this frame is not overly ornate.

It's quite simple.

The style appears to be Rococo as it has asymmetrical shapes and motifs.

In the Rococo design, these are usually shells, flowers and foliage.

As this frame had damage to it, I could see it was gesso (pronounced 'Jesso') on wood.

Gesso in the old days was made by mixing chalk or gypsum, animal glue (usually from rabbit skin) and white pigment.

I believe this frame is very old.

It's age is a mystery.

What do you think?

Please share your thoughts.

In my mind's eye, the painting that once was housed inside the frame, was of elegant aristocrats in gorgeous clothing enjoying a picnic in a romantic scenic place.

I would have loved to see what that may have been.

But alas, I inherited just the worn and shabby chic frame.

Old Frame DIY Mood Board

It never crossed my mind to repaint it.

Its unique beauty 'as is' is undeniable.

Mia Bella Passions Blog

It also looks fabulous against the ply wall and with the green painted wall on the opposite side of the room.

DIY Old Frame Mood Board

To create the mood board, I recycled heavy cardboard, and cut it to size for the back.

Then cut cork tiles to fit the cardboard.

DIY Old Frame Mood Board

I used woodworkers PVA glue to attach the cork tiles to the cardboard.

Once the glue was dry, set it in the frame, reusing the original tabs on the back to hold it in place.

DIY Old Frame Mood Board

After covering the tabs with masking tape, I attached picture mechanisms and wire for hanging.

It's quite a heavy frame!

DIY Old Frame Mood Board

Then for the fun bit - adding arty images and quotes using pearl-head sewing pins.

DIY Old Frame Mood Board

Now it hangs in pride of place above my studio work desk, and I adore it!

Feel free to comment on the frame's heritage.

I'm keen to know more about its origin.

:)

Upcycled Frames

If you enjoyed this project, you might like the 

Upcycled Frame Jewellery Display

  For the latest posts JOIN  :)

#upcycling #oldframediy #diy


Spiced Apricot Cake

Apricot Cake

    Using canned apricot halves in your cake batter can result in an incredibly moist and flavorful dessert or afternoon tea cake, that will have everyone coming back for seconds!

Apricot Cake

Spiced Apricot cake is just that!

Apricot Cake

Moist, flavourful and definitely one serving is never enough!

     Apricot CakeApricot Cake

Apricot Cake
Apricot Cake


Spiced Apricot Cake 

You Will Need:

680 gram (24oz) can or Jar of apricot halves.

1 Tablespoon fresh lemon juice

3/4 cup softened butter

1 cup fine caster sugar

2 teaspoons vanilla extract

4 large eggs

2 and a 1/2 cups plain flour

3 teaspoons baking powder

2 teaspoons cinnamon

1 teaspoon nutmeg

Powdered icing sugar is used to sprinkle on top once baked and cooled.

To Make:

Preheat oven to 180 Celsius (350F)

Grease and line with baking parchment paper, a 23cm (9 inch) round cake pan with a removable bottom.

Drain the apricots and put aside ten halves.

Blend the remaining ones to a puree and set aside.

Cream the butter, sugar and vanilla in a cake mixer until light and fluffy.

Add eggs, one at a time until creamy.

Add the lemon juice and apricot puree.

Then the sifted dry ingredients and spices.

Place the cake batter into the tin and place the ten apricot halves on top of the batter.

Bake for 50 minutes.

Place a sheet of tin foil over the top of the cake once it is browned and continue cooking until a skewer comes out clean.

Cool in the tin.

Remove from the cake tin, place on a pretty plate and dust with the powdered icing sugar.

Apricot Cake

Slice the cake and enjoy the deliciously moist and flavorful treat warm with runny or whipped cream!

Or serve cold with a cup of tea or coffee.

It is fabulous served either way!

Printable recipe HERE.

For the latest posts JOIN  :)


#apricots #cakes #fruitcakes #homebaked


The Intriguing World Of Spider Plants

 Spider plants, scientifically known as Chlorophytum comosum, have become a worldwide favourite among plant enthusiasts.

Spider Pot Plants

Spider plants are a beautiful and versatile pot plant addition to any indoor space. With their rich history and reasonably easy-care requirements, they make the perfect plant for both beginner and experienced gardeners alike. 

They are a popular indoor plant due to their air-purifying qualities, and unique appearance, with thin sword-like leaves having a centre cream white stripe.

My mother had a spider pot plant growing when I was a child, and I remember being fascinated by the 'babies' the plant prolifically produced.

Spider Pot Plants

I have mine at the 'Town House' in a large white pot on a display cabinet in my kitchen.

It's a perfect position, as it has the height for the spider plantlets to hang down, there's no draft and it is in bright light.

History of Spider Plants:

Spider plants have been cultivated as ornamental plants for centuries. They were first introduced to Europe in the late 18th century and quickly gained popularity due to their attractive foliage and ability to thrive indoors.

In their natural habitat, these plants are truly a sight to behold.

Spider plants are native to the tropical and subtropical regions of Africa, specifically found in South Africa and Madagascar. In the wild, these plants can be seen growing in the lush forest floors and hanging from tree branches.

One of the most fascinating aspects of spider plants in their natural habitat is their ability to reproduce. These plants produce tiny white flowers that eventually develop into small plantlets, which can be seen hanging from the mother plant like spiders on a web, hence the name "spider plant."

Another interesting characteristic of spider plants is their adaptability to their surroundings. They can thrive in bright and low light conditions, making them a versatile plant growing in the wild, and in homes.

Spider Pot Plants

Caring for Spider Plants: 

Spider plants are relatively easy to care for and can thrive in a variety of environments. Here are some tips for keeping your spider plant healthy:

· Light: Spider plants prefer bright, indirect light. Avoid placing them in direct sunlight as this can scorch their leaves.

· Watering: Water your spider plant when the top inch of soil feels dry to touch. Be sure not to overwater, as this can lead to root rot.

· Temperature and Humidity: Spider plants prefer moderate temperatures and high humidity. Avoid placing them near drafts or heating vents.

· Fertilizing: During the growing season, fertilize your spider plant with a balanced liquid fertilizer every two weeks.

Propagation:

Simply cut off the offshoot plantlets once they have developed roots then plant them in a separate pot with well-draining soil.

Place the new plant in indirect light and water it regularly to encourage healthy growth. 

Pests and Diseases

Like any plant, Spider Plants are susceptible to pests and diseases that can affect their health and appearance.

Monitoring your spider plant for pests and diseases, whilst addressing any issues causing brown tips on the leaves, means you can help your plant thrive and maintain its beauty.

Common pests that can infest spider plants include spider mites, aphids, and mealybugs. Spider mites are tiny arachnids that suck sap from the leaves, causing yellowing and stippling. Aphids are small insects that feed on the plant sap, while mealybugs look like white cottony masses on the leaves.

Spider plants can also be affected by diseases such as leaf spot, root rot, and powdery mildew. Leaf spot is characterized by dark spots on the leaves, while root rot is caused by overwatering and can lead to wilting and yellowing of the leaves. Powdery mildew appears as a white powdery substance on the leaves.

Causes of Brown Tips:

Brown tips on spider plant leaves can be caused by various factors, including overwatering, underwatering, low humidity, exposure to cold drafts, or too much direct sunlight. It's important to ensure the plant is watered evenly, placed in a suitable location, and kept away from extreme temperatures.

Spider Pot Plants

Growing Outside:

Spider plants can be grown in the garden. In fact, they thrive in part shade areas, or under trees with filtered light. They are known once established in suitable conditions to have invasive qualities.  

I grew them at the 'Mia Bella Passions Homestead' garden in a retained border bed where they looked fabulous, but also where I had control of their growth and plantlets.

They tolerate temperatures as low as 35 degrees Fahrenheit (1.6 Celcius).

Spider Pot Plants

For The Vase:

Spider plants make a wonderful addition to the flower vase. Strings of plantlets hanging down the sides of a large vase.  

Spider Pot Plants

Or as I have done, several individual plantlets in a small vase with the double freesias.

For the latest posts JOIN :)


#spiderplants #potplants #easytogrowpotplants


Easy Cucumber Salmon Tomato Canapes

 Cucumber Salmon Tomato Canapes are the perfect appetiser for any occasion!

Canape appetiser recipes

        They are the simple solution for a healthy snack or lunch, an appetiser, or a summer treat with drinks at Happy Hour!

With just a few ingredients and minimal prep time, you can whip up a batch of these tasty treats in no time at all.  

Canape appetiser recipes

They take just 15 minutes from prep start to yum delish. 

You can make them ahead of time and store them in the refrigerator until you're ready to serve, making them a convenient option for busy hosts. 

Canape appetiser recipesCanape appetiser recipes

    Canape appetiser recipesCanape appetiser recipes

    Canape appetiser recipesCanape appetiser recipesCanape appetiser recipes

Cucumber Salmon Tomato Canapes

You Will Need:

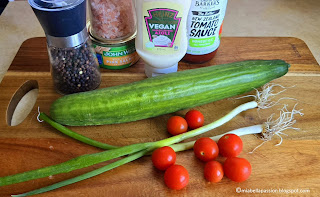
 1 long telegraph cucumber

2 thin spring onion stems

1 (210 gram) can of salmon, drained

1/2 cup aioli

1 tablespoon tomato sauce

Salt and pepper to taste

 Halved cherry tomatoes for garnish

Fresh coriander leaves and violas for plate decoration

To Make: 

1. Cut the cucumber into thin slices.

2. In a small bowl, mix together the salmon, aoli, tomato sauce, one stem of chopped spring onion, salt, and pepper.

3. Top each cucumber slice with a spoonful of the salmon mixture.

4. Top with a cherry tomato half, cut side upwards. 

 Sprinkle more chopped spring onion on the top.

 5. Garnish the place with fresh coriander leaves and viola flowers.

 6. Serve and enjoy!

Canape appetiser recipes

Interesting Facts About Cucumber

Cucumbers belong to the gourd family and are widely cultivated for their edible fruit. 

Yes, fruit! It is not a vegetable.

· Cucumbers are composed of about 95% water, making them a hydrating and refreshing snack.

· They are low in calories but high in beneficial nutrients like Vitamins A, B1, B6, K and C.

· Cucumbers can aid in weight loss, improve digestion, and promote overall hydration.

· They are commonly used in salads, pickles

and even skincare products due to their soothing properties.

· Cucumbers come in different varieties and shapes, which include slicing cucumbers, pickling cucumbers, seedless cucumbers and Apple cucumbers.

Apple cucumbers have a pale greenish-white thin skin and can be eaten like an apple!


Printable recipe HERE.


For the latest posts JOIN :)


#canapes #appetisers #cucumber  #tuna #easysnacks


White Chocolate Cherry Tart

 Celebrate a birthday, or any special occasion or simply delight your guests, with this delectable dessert.

Sweet Tart Recipes

The tart has a soft chocolate pastry base.

Sweet Tart Recipes

Teamed with a white chocolate custard filling and soft red (jar or canned) cherries hiding throughout it.

It is moist and delicious!

Sweet Tart Recipes

You won't need the juice from the cherry jar or can for this recipe, so I always save it by straining it into a glass.

Topped up with ice-cold water you'll get a lovely refreshing drink as you prepare the tart.

       Sweet Tart Recipes  Sweet Tart Recipes

         Sweet Tart Recipes       Sweet Tart Recipes

Sweet Tart Recipes

Sweet Tart Recipes

White Chocolate Cherry Tart

For The Pastry:

175 grams ( 6.17 ounces) of plain flour

4 Tablespoons of caster sugar

2 Tablespoons of cocoa powder

125 grams ( 4.40 ounces) of butter, chilled and cubed

1 medium egg yolk

1 Tablespoon cold water

In a food processor, pulse the flour and the cocoa to combine. Add the butter and pulse to the crumbling stage.

(if you don't have a food processor you can rub the butter into the flour/cocoa using clean fingers)

Next, add the sugar, then the egg yolk, and water.

You want the pastry to come together in a dough, so add more water if needed.

Press into a 23 x 23cm  (9 x 9 inch)

    Chill for 30 minutes while the oven preheats to 200 degrees Celsius  ( 392 Fahrenheit) 

Bake for 20 minutes.

Set aside to cool while you make the filling.

Reduce temperature to 140 Celsius ( 284 Fahrenheit) now.


For The Filling: 

2 medium eggs, plus the yolk from the pastry

1 teaspoon vanilla essence or paste

200 grams (1 and 1/4 cups) of white chocolate melts

500 ml (2 cups) double cream

250g pitted jar or can of cherries, drained

In a pot whisk together eggs, the egg yolk, and vanilla until combined.

Heat the cream until just steaming, lower the heat, then stirring constantly add the egg mixture. When it is slightly thickened, remove it from the heat and add the chocolate.  

Stir until the chocolate is melted.

Place the drained cherries over the chocolate pastry, and carefully pour over the custard.

Any excess custard can be baked in ramekins to be served with extra cherries and cream.

(I had two ramekins of excess custard)

Bake for 40 to 50 minutes.

Cool completely in the tin.

Cut into pieces to serve.  

Yield: 6 large or 9 small servings.

Printable recipe HERE

Sweet Tart Recipes

Grab a cuppa, and visit

 my Fine Art America gift store

:)

Sweet Tart Recipes

New Zealand Bloggers

For the latest posts JOIN :)


#tarts #cherry #cherrytart #custardtart


Related Posts Plugin for WordPress, Blogger...