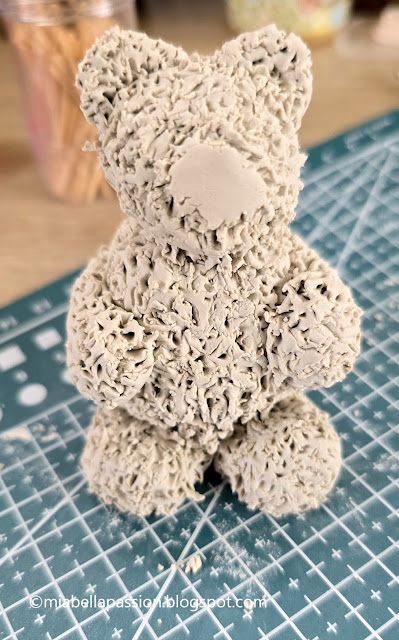
DIY Teddy Bear Clay Craft

Airdry clay craft 

This super cute airdry clay teddy bear is not too difficult to create for a special ornament to gift, or you can use these 'how to' instructions to make it out of modeling fondant for a cake topper.

But today we are making it using the air dry clay.

On a tabletop or a craft cutting board roll a ball of clay that is about 5cm (2 inches) in size to an oval shape. 

Airdry clay craft

For the legs and arms, make four  3cm (1 1/2 inch) small sausages.

Airdry clay craft

Squash the ends (this is where they attach to the body).

Airdry clay craft

Attach by blending underneath with a flat edge tool and at the back of the bear's body, then create a fur effect using a pointed tool.

Do the same to make two arms.

Attach the legs to the body blending the flat part into the base of the body clay.

Airdry clay craft

Attach the arms in the same way.

Airdry clay craft

Use a pointed tool to rough up the clay to resemble fur.

You can manipulate the bear to sit flat and into the sitting shape you want.

Airdry clay craftAirdry clay craft

To make the head roll a 2.5cm (1 inch) ball, a smaller one for the nose area, and two smaller ones for the ears.

Squash the balls, and cut out two ear shapes.

(see photograph above)

Position nose plate, and ears on the head, and attach blending clay to meld.

        Airdry clay craft Airdry clay craft

Attach the head to the body using a toothpick pushing into the centre of the body to support it.

Airdry clay craft

Blend the clay around the neck area.

And use the pointed tool to create fur to blend the join.

(Take particular attention when melding the neck to the body, as when mine dried the clay shrunk (for lack of melding) and left a gap between the body and head, but reattachment using PVA glue fixed it fine).

The photo above is what your bear should look like.

Airdry clay craft

Make little dots for the eyes and nose. I had black clay for this, but you can use natural and paint them later when it's dry.

Attach using a pointed tool.

Leave to dry.

(It takes about five days).

Once the teddy is completely dry, you can paint it any colour you want.

Touch up the nose and eyes with black paint if necessary.

Airdry clay craft

When the paint is dry, seal the entire bear with a clear sealer.

I used a clearcoat spray sealer on the naturally coloured clay.

Airdry clay craft

I hope all the photographs in this tutorial help you create your own sweet teddy bear.  :)

For the latest posts JOIN  :)


#airdyclaycraft #fondantcaketopper #teddybearcraft


Upcycled Antique Frame Mood Board

Dating old frames

This beautiful old frame found me.

I love how things appear for you when they are meant to be yours!

The first thing I thought about upcycling it into was a mood board for my studio's little quotes and art inspirations.

But first, let's have a chat about this frame.

This is where I might need your help!

Is it Victorian? 19th century? Faux old? 

French? Replica?

Old frames

I spent many hours researching on Google to no avail.

There were many much more ornately decorated and gold-gilded ones in similar styles.  

But nothing quite the same as this frame is not overly ornate.

It's quite simple.

The style appears to be Rococo as it has asymmetrical shapes and motifs.

In the Rococo design, these are usually shells, flowers and foliage.

As this frame had damage to it, I could see it was gesso (pronounced 'Jesso') on wood.

Gesso in the old days was made by mixing chalk or gypsum, animal glue (usually from rabbit skin) and white pigment.

I believe this frame is very old.

It's age is a mystery.

What do you think?

Please share your thoughts.

In my mind's eye, the painting that once was housed inside the frame, was of elegant aristocrats in gorgeous clothing enjoying a picnic in a romantic scenic place.

I would have loved to see what that may have been.

But alas, I inherited just the worn and shabby chic frame.

Old Frame DIY Mood Board

It never crossed my mind to repaint it.

Its unique beauty 'as is' is undeniable.

Mia Bella Passions Blog

It also looks fabulous against the ply wall and with the green painted wall on the opposite side of the room.

DIY Old Frame Mood Board

To create the mood board, I recycled heavy cardboard, and cut it to size for the back.

Then cut cork tiles to fit the cardboard.

DIY Old Frame Mood Board

I used woodworkers PVA glue to attach the cork tiles to the cardboard.

Once the glue was dry, set it in the frame, reusing the original tabs on the back to hold it in place.

DIY Old Frame Mood Board

After covering the tabs with masking tape, I attached picture mechanisms and wire for hanging.

It's quite a heavy frame!

DIY Old Frame Mood Board

Then for the fun bit - adding arty images and quotes using pearl-head sewing pins.

DIY Old Frame Mood Board

Now it hangs in pride of place above my studio work desk, and I adore it!

Feel free to comment on the frame's heritage.

I'm keen to know more about its origin.

:)

Upcycled Frames

If you enjoyed this project, you might like the 

Upcycled Frame Jewellery Display

  For the latest posts JOIN  :)

#upcycling #oldframediy #diy


Spiced Apricot Cake

Apricot Cake

    Using canned apricot halves in your cake batter can result in an incredibly moist and flavorful dessert or afternoon tea cake, that will have everyone coming back for seconds!

Apricot Cake

Spiced Apricot cake is just that!

Apricot Cake

Moist, flavourful and definitely one serving is never enough!

     Apricot CakeApricot Cake

Apricot Cake
Apricot Cake


Spiced Apricot Cake 

You Will Need:

680 gram (24oz) can or Jar of apricot halves.

1 Tablespoon fresh lemon juice

3/4 cup softened butter

1 cup fine caster sugar

2 teaspoons vanilla extract

4 large eggs

2 and a 1/2 cups plain flour

3 teaspoons baking powder

2 teaspoons cinnamon

1 teaspoon nutmeg

Powdered icing sugar is used to sprinkle on top once baked and cooled.

To Make:

Preheat oven to 180 Celsius (350F)

Grease and line with baking parchment paper, a 23cm (9 inch) round cake pan with a removable bottom.

Drain the apricots and put aside ten halves.

Blend the remaining ones to a puree and set aside.

Cream the butter, sugar and vanilla in a cake mixer until light and fluffy.

Add eggs, one at a time until creamy.

Add the lemon juice and apricot puree.

Then the sifted dry ingredients and spices.

Place the cake batter into the tin and place the ten apricot halves on top of the batter.

Bake for 50 minutes.

Place a sheet of tin foil over the top of the cake once it is browned and continue cooking until a skewer comes out clean.

Cool in the tin.

Remove from the cake tin, place on a pretty plate and dust with the powdered icing sugar.

Apricot Cake

Slice the cake and enjoy the deliciously moist and flavorful treat warm with runny or whipped cream!

Or serve cold with a cup of tea or coffee.

It is fabulous served either way!

Printable recipe HERE.

For the latest posts JOIN  :)


#apricots #cakes #fruitcakes #homebaked


Related Posts Plugin for WordPress, Blogger...