Gorgeousness...


Today it is all about simply sharing some gorgeousness
Enjoy!


Olive Oil & White Vinegar Furniture Polish...

I am still muddling away on the French country masculine bedroom makeover.
The patch and repairs from the botched previous painting session are now complete.
Ensuite bathroom window now painted, and the floor polished.
The drapes are hemmed, pressed and hung.
All that remains is to sew a new blind for the small window.
The furniture in this room makeover is to remain unpainted 
in all its natural wood glory...
And it was well time for a lick of polish, so today I whipped up a home-made DIY Furniture polish...
Simply made from two ingredients.
Olive oil & white vinegar...
3/4 cup Olive Oil
and
1/4 cup White Vinegar
DIY natural Furniture polish
So as I was mixing this up, I thought, " Wow, what a great gift idea".
Hence, I got a wee bit sidetracked from polishing the bedroom furniture!
Home Made Gift Ideas
So here is the polish...
looking pretty 
with label, gauze ribbon, flowers and pearls...
ready to gift!
Home made Gift Ideas
Anyway, back to the task at hand,
Which was to mix the polish and polish up the furniture.
The side tables have scratches.
DIY natural Furniture polish
And now you can hardly see them!
DIY natural Furniture polish
I am having a whoohoo moment!
DIY natural Furniture polish
And it just kept on getting better!
As you can see:
The tall boy chest of drawers, with water marks, sun damage, and scratches...
DIY natural Furniture polish
Rescued by my DIY olive oil & white vinegar furniture polish 
that quite kindly rehydrated that thirsty wood.
DIY natural Furniture polish
It was an instant result!
 Miraculously blending all those marks and scratches to almost nothingness.
How did I not know about this wonderful DIY polish before!
I have always had a love-hate relationship 
with this Balinese rosewood vase:
So I brushed my polish onto it, 
and thought...
You are actually quite beautiful!
But can you believe the difference here....
DIY natural Furniture polish
I just don't know how many times I muttered, 
"This is AMAZING!".
DIY natural Furniture polish
It doesn't take long for the oil to soak into the thirsty dry wood!
Now the carved vase has a place to call home in the French country masculine bedroom makeover!
Guess what I'm doing for the rest of today...
Polishing all the wood in my house!
NZ Lifestyle Bloggers
For updates about the latest blog posts,
you can join for free HERE.

#diyfurniturepolish

Free 'Mia Bella Gardens' Black And White Photo Printables...

As you know, I am in the midst of a home do-up. 
The Master Bedroom is the first room in the house to get a makeover.
I  really liked the mirror idea for above the bedside tables...
So off I went to the shops and found the most delicious mirrors
 , black with a hint of masculine French Country styling.
BUT they were at a horrific price.
It would have cost $120 for two mirrors!!!
OUCH!!!
And as I have a list of rooms to makeover, 
AND I am saving for a house lot of new carpet,
spending that much was just not an option.
So....
I picked up two lovely long black frames with white mats 
($25 sale price for two).
Each frame would hold three photographs each.
 I could have taken images straight from the Internet,
(which I did do for one art piece in the room)
but for these frames
I wanted something a bit more personal.
I saw 'Sarah Richardson designer' do it on one of her 'Sarah 101' shows.
In fact Sarah and Tommy quite often do original photography or art 
when the budget does not allow for Gallery bought!
So...
out came the camera, and I got snapping crazy!
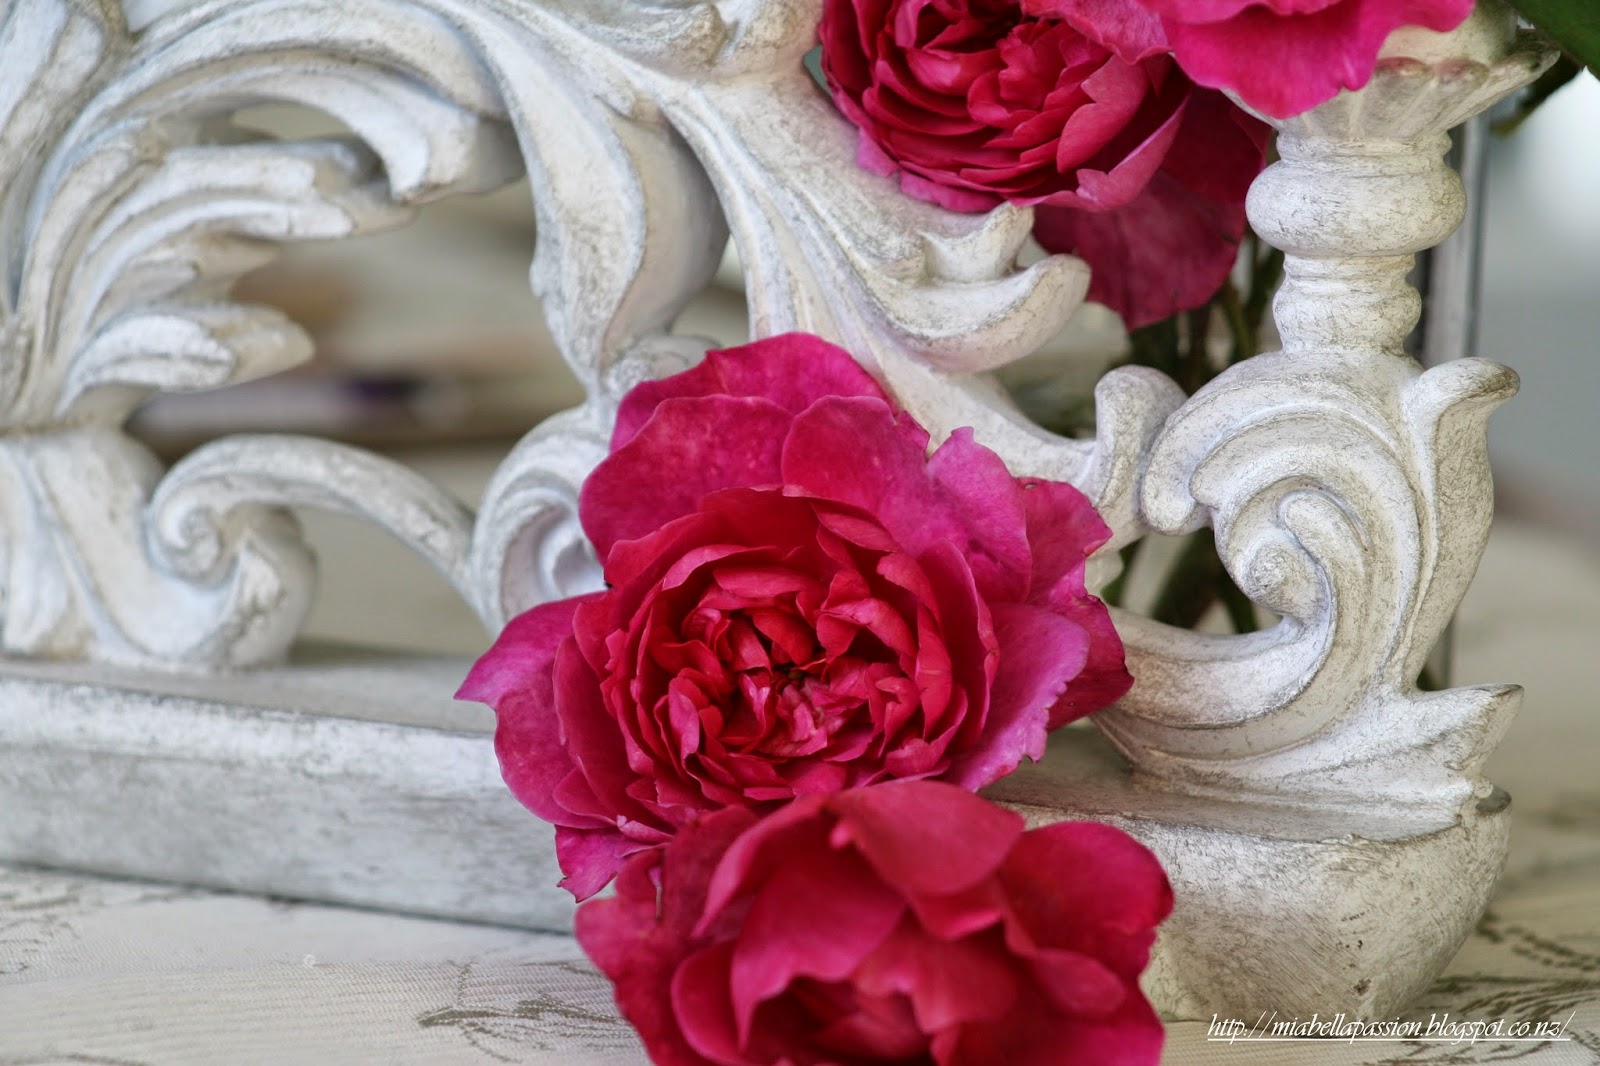
 As I wandered around 'Mia Bella Gardens' and inside the house, I looked for interesting shapes, leaves and flowers.
From the thirty or so photos,
I chose my favourites,
printed them ($6.00),
popped them in the frames,
and hung them above the bedside tables.
Total cost $31.00!!!!
AND they look AMAZING!
:)
As I love to share,
here are the watermark-free photographs.
FREE for you to copy 
(just right click & save to your home computer), 
print and enjoy.
You could use them for card-making, too.
(Note: Copyright applies for professional use, 
so please contact me for permission
via the Disclaimer page.)

And coming soon...
(yes, I know...it's taking forever!)
The big reveal of the Master Bedroom Makeover
where you can see how I used the framed photo prints.
Enjoy…
FREE Black and white photography prints
'French Detail'
FREE Black and white photography prints
'Brugmansia Bud'
FREE Black and white photography prints
'Strelitzia Leaf'
FREE Black and white photography prints
'Fruitsalad Plant No1'
FREE Black and white photography prints
'Five Finger Leaf'
FREE Black and white photography prints
'Leaves'
FREE Black and white photography prints
'Eiffel Tower'
FREE Black and white photography prints
                                                      'Fruitsalad Plant No2'
FREE Black and white photography prints
'Gourd Flower & Bud'
FREE Black and white photography prints
'Fern Furl'
FREE Black and white photography prints
'Birdsnest Fern'
FREE Black and white photography prints
'Fleur de Lis'
FREE Black and white photography prints
 'French Heart'
FREE Black and white photography prints
'Leaf Veins'
FREE Black and white photography prints
'Metal Love'
FREE Black and white photography prints
'Wheel'

NZ Lifestyle Bloggers
For updates about the latest blog posts,
you can join for free HERE.

#freeprintables #freephotographicprintables #black&whiteprintables

Latest Furniture Piece...

Now you all know how I adore upcycled furniture, re-purposing of the tired and frumpy, 
and just plain old boring wooden pieces of bygone eras.
 I needed a bedside to match the chest of drawers with Queen Anne legs.
I found the perfect piece already upcycled, and here it is in all its divine glory.
French Country
Isn't it cute?
I have a love affair with Queen Anne legs!
French Country
I love the gentle curves on the top of the cabinet...
Can you see them hiding just behind the pretties?
French Country
And the knob is a hint of bling (of course)!
French Country
 A furniture photo shoot is a plain old good excuse to share some pretty things, too.
like 'Mia Bella Garden' flowers and a light-catching mosaic glass ball.
French Country
The flowers are:
Chrysanthemums, purple linaria, and the glorious pink blooms of Mandevilla 'Parfait'.
Did you know that this vine flower lasts well in a vase!!
Perfect for little posies as they don't have very long stems.
This posy was strategically placed for the photos, but will be going in a small vase to be enjoyed.
NZ Lifestyle Bloggers
For updates about the latest blog posts,
you can join for free HERE.

#frenchcountry

Easter Table at Mia Bella...

This year's table is a simple pastel theme.
With a gorgeous aqua coloured table cloth, 
and pale pink and white spot table runner.
Easter table ideas
I filled my spotty aqua bowl with pretty pink Japanese anemones, a few pink geraniums,
and white portulacas.
(Did you know portulacas last really well in a vase?)
Easter table ideas
 Ombre foil-wrapped chocolate eggs to scatter.
Easter table ideas
 And a cute white ceramic Easter bunny as a centrepiece focal!
Easter table ideas
Mister rabbit sits in pride of place
upon a large and small mismatched pair of French-inspired platters.
Some loose flowers were scattered, just to add some more prettiness.
And there you have it...
a simple Easter no fuss, but pretty table!

NZ Lifestyle Bloggers
For updates about the latest blog posts,
you can join for free HERE.

#easyeastertabledecor  #easterideas

NO SEW Slip Covers...

I kid you not...
NO SEW Slip Covers!
This would have been the simplest project I have ever undertaken.
From start to finish, it took half an hour.
It would likely have been finished quicker...
But the first pair of squabs covered
I managed to place the fabric the wrong way round, so I had to redo it.
Remember the 'ZIP TO THE BACK RULE', people!
So here is the end result...
DIY Slip Covers
What do you think?
Want to know how?
SIMPLY use small safety pins!
DIY Slip Covers
That's the secret NO SEW bit.
(I saw this idea on Pinterest.)
You can use a piece of fabric that is cut to size,
SIMPLY (don't you LOVE that word?) place your squab onto it
on the fabric and wrap it neatly.
DIY Slip Covers
Just as if you are wrapping a parcel.
And then all you do is...
DIY Slip Covers
SIMPLY place the safety pins in strategic positions to hold it all in place!
I used an old duvet cover to cover both the squabs, as I really liked the piping effect,
and I was being frugal, repurposing what I had.
Minutes after the newly covered squabs were placed on the
covered patio couch, the comfort testing team promptly arrived!
"Yes...superb", said Shanti-Rose!
DIY Slip Covers
(Remember that you are inspecting my Mamma's NO SEW Couch Covers, and not my obvious addiction to cat treats!) 
DIY Slip Covers
"So comfy, and now I am feeling sleepy"...said Tucker!
"Looks good...comfort approved...we've decided to stay!".
DIY Slip Covers
Emmm, Tucker and Shanti-rose
 may have couch to people sharing issues, I think!
NZ Lifestyle Bloggers
For updates about the latest blog posts,
you can join for free HERE.

#diyslipcovers #nosewslipcovers #slipcovers