Gorgeous 'Ocean Beauty' Sheer Wrap...

Today I'm sharing this gorgeous wrap that I have designed.
It's modelled by my equally gorgeous daughter April. 
(sorry product is now sold out, but sharing my beautiful daughter pics anyway)

 This sheer wrap is perfect for all seasons.

Worn with a white cami singlet top in the warm seasons.
And with longer sleeves with extra under layers in the cooler seasons.

This design is taken from my original abstract oil painting called 'Ocean Beauty'.

The wrap fabric is soft and slightly sheer. 
And it flows beautifully.


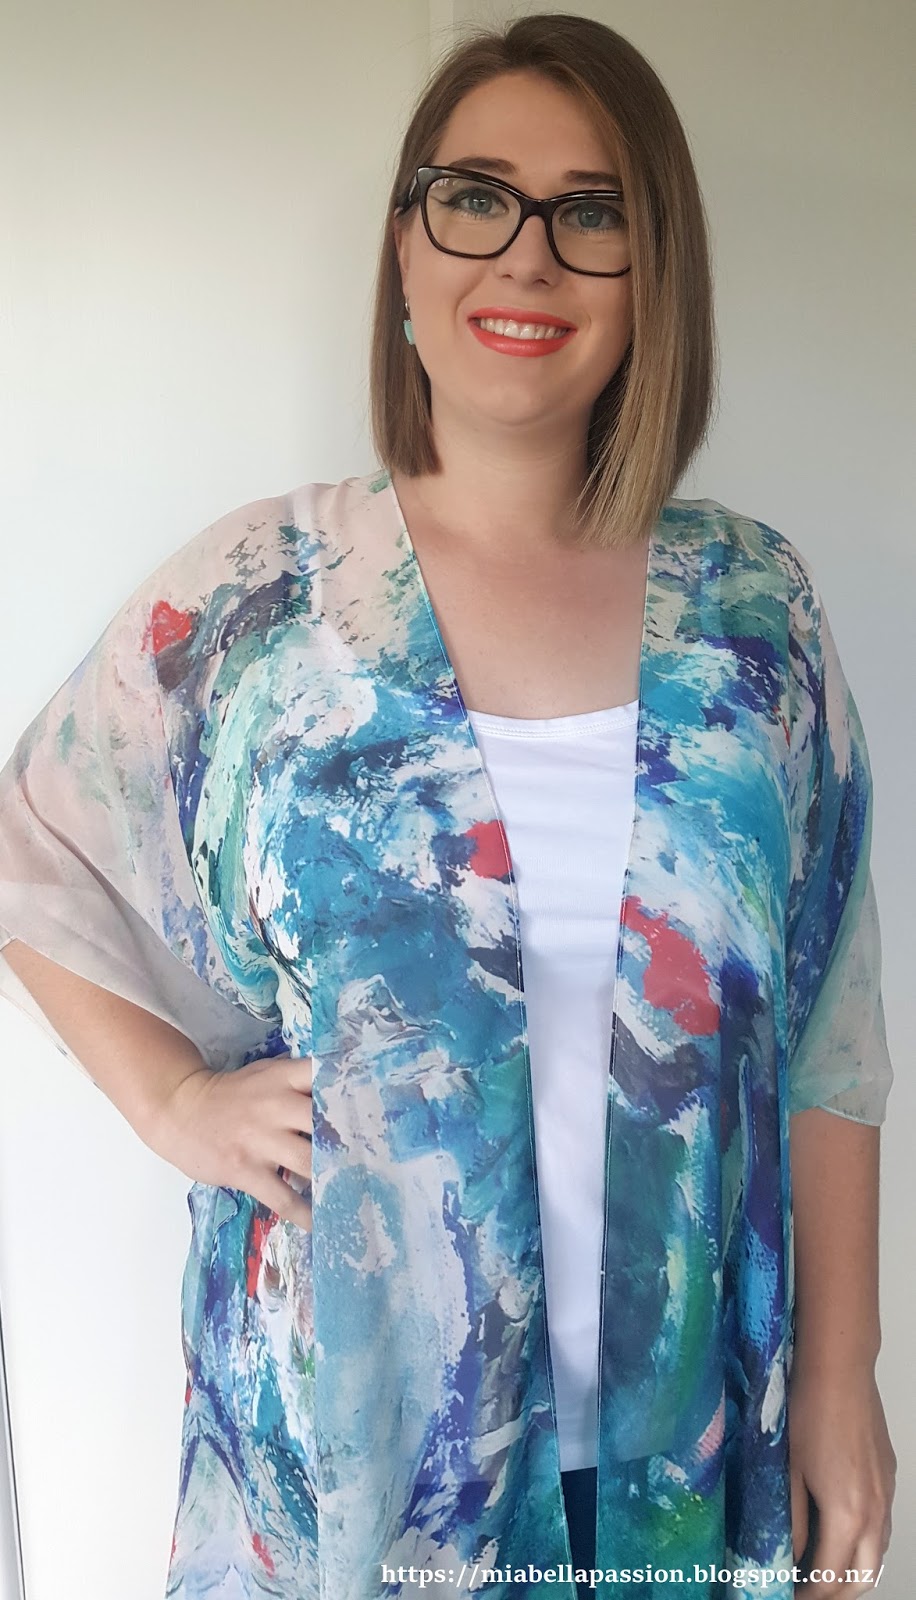
The fact my daughter loves to wear my designs makes me one very proud happy artistic designer.

:)

#artisticapparel #designerclothing #Fashion #wearart #nzbloggers #newzealsandartist


DIY Carnation Pom Pom Flowers...

Paper flower craft

Tissue paper carnation pom pom flowers are so easy to make.
And they have a myriad of uses.
You can make a banner with them to decorate your homes decor or porch for celebrations:
pool parties, birthdays, anniversaries, baby showers,
weddings, Christmas, Easter, Valentines Day....
And probably a whole lot more uses than I have listed here.
So let's get to the nitty gritty of how to create them.


Cut 6 layers of tissue paper into a 11cm by 16cm rectangle.


Concertina 2cm folds (over/under) as shown.


Cut ends to curve as shown.


Tie a string or thin ribbon to make hanger.
Tie loosely not tightly.
If you tie too tight it will make it much harder to pull out and separate the layers.

Pull each end out as if a fan.


Now carefully separate and fluff out each tissue layer.

 You can make the Carnation Pom Pom flowers out of any solid coloured or patterned  tissue paper.

Here I have used the carnation pom pom flowers to make a little banner.


They really are so delicate and pretty...


And here they are used as a Christmas decoration.


#carnation #paperflowers #craft #diy #pompoms


Arty Nail Polish Rocks...


Arty Nail Polish Rocks are super easy to create...

All you need are a selection of old nail polishes in the colours of your choice...
and somewhere well ventilated to do this project.
(As boy oh boy - polish is pretty fumy stuff!)


You'll also need:
A bowl of cold water and a toothpick.
Plus some oval shaped rocks.

 To Create:
Drip the nailpolish in a pattern on top of the water...
Then quickly run the toothpick through the polish.

 Hold the rock over the polish and push down so water covers rock,
and then pull out of water.
Turn and place rock right side up on paper to dry.

 This is the end result.

 Once dry they can be gifted...
or placed on a windowsill, coffee table, on the patio, in plant pots or in the garden in groups.
Don't you think these are pretty?
This colour combination reminds me of a paua (abalone) shell.


#rockcrafts #art #paintedrocks 


The Droplet...


It has rained a lot here in the Bay Of Plenty, New Zealand.
But...
in between showers...
when the sun attempts to shine...
the light is especially amazing!
I thought I would share a recent photograph that captures a tiny water droplet.


#newzealandphotographer #photography #nature #raindrop


French Map & Cacti Pots...❥

Decorating pots ideas
Ok - I admit I really do have 'a thing' for cacti.
Let's blame my Grandad.
He had a vast collection in pots, and as a child I would watch him tend them with so much love!
Decorating pots ideas
For this project I painted some small terracotta pots with with chalk paint.
Then left them a day to dry.
Decorating pots ideas
Next steps require Mod Podge.
(In new Zealand this is available at most craft outlets.)
Decorating pots ideas
And some decoupage paper.
Though you could use fancy serviettes if preferred.
If you use serviettes, take of the back layer of paper.
Decorating pots ideas
I'm loving this cool map design...
Decorating pots ideas
Measure the paper to size, brush wrong side with Mod Podge and manipulate it on to the pot.
You'll need to pleat it to fit the curves.
Decorating pots ideas
 Leave to dry.
Once dry, seal with a layer of clear sealer that will tolerate outdoor conditions.
Decorating pots ideas
 Once sealed, leave to dry for a week.
Decorating pots ideas
 Then, plant the desired plants using a suitable potting medium.
Which, in my case, is cacti.
But you could plant an annual flower like a pansy.

Decorating pots ideas
I'm planting baby cacti.
But you could plant an annual flower like a pansy.
Decorating pots ideas
And don't these sweet French Map pots look fab on this railing top on my covered deck?
NZ Lifestyle Bloggers
For updates about the latest blog posts,
you can join for free HERE.


#decoupage #maps #cactus #cacti #paintedpots #diy

Ghost Cake & Icecream Cone Toppers...

HALLOWEEN Meringue Ghosts
Spooky cute seems to be the thing for my Halloween preparations this year.
With more little ghosts.

HALLOWEEN Meringue Ghosts
These ones are the edible kind.
Made from meringue, 
these guys are perfect as a cake topper or ice cream cone topper.
They really are not difficult to make.
You will need meringue.
For the printable meringue recipe click HERE.

Note cooking time differs from what's stated in the recipe.
The Ghosts need to be baked at 100 degrees Celsius for 40 minutes.

Once the meringue is whipped up, 
 onto a baking paper lined tray, 
pipe spirals - large to small with a peak.
You decide the size.
Ice cream topper = smaller
Cake topper = bigger

No icing tip is needed. 
Just a plastic bag filled with meringue that has had the corner cut off.
Once baked and cold.
Pipe dots for eyes using black icing.
Store in an airtight container until needed.

HALLOWEEN Meringue Ghosts
Top your favourite cake, or your cone of ice cream with a spooky cute meringue ghost.

HALLOWEEN Meringue Ghosts
Or pop them on a cake stand and eat as is.

MORE HALLOWEEN IDEAS & PRINTABLES HERE

#halloween #baking #caketopper #meringue #ghosts


Driftwood Ghost Halloween Banner....

The Halloween sideboard display is coming together nicely...
But I needed a banner for the background wall.
Just something small but a little spooky.
So I went to the beach and collected some flat ghost shaped pieces of driftwood.


Then got out my trusty chalk paint ...

 and gave the fronts a coat of white.

Next some ghostly eyes and mouth using a permanent marker pen.
I'm not sure these are very spooky as they are kinda cute!

To make the banner I hot glued the backside of the driftwood pieces along the string.

And hung it up.

How easy to create.
And a fun activity to do with the kids pre-Halloween.


#halloween #craft #driftwood #ghosts