DIY Secret Book Storage....❥


secret storage
How cool is this?
Old books turned into secret storage.
It's actually quite easy to make - here's how...

You will need:
A strong cardboard box with or without a lid. (mine has a lid)
6 old books (or as many books to hide front and sides of the box)
A strong glue or a glue gun (I ended up using the glue gun)
Scissors

Step One:  Dismantle enough books to cover the front of the box with the spines.


Step Two:  Use a cover page to cut to the shape of the row of books for the front of the box.


Glue the spines onto this.
Try to maintain the curvature of the book spine.


Step Three: Glue this front piece to the box.


Step Four: Glue the last two books to each side of the box.

Book craft
Place it high up on a shelf.
You now have a very funky 'set of old books' that actually has secret storage behind it.


#DIY #oldbooks #secretstorage


You might like to also visit:
My store at Fine Art America & Redbubble   :)


'The Art Of Balance' painting is now available at America Fine Art.
The title and the feather balancing on the birds head relates to how we balance the many facets of our lives.


The bird is a contemporary interpretation of the New Zealand native TUI bird. 
(original painting sold)


#newzealandartist #contemporary #bird #art #painting #abstract #impressionist #tui #birdart #newzealandbirdart


Homemade Silver Jewelry Cleaner...❥

Well you know I have seen this cleaner diy on zillions of blogs and on Pinterest....
And I have for years thought...must try it.
Then the day came that I had a lot of silver that was tarnished and unwearable,
so I thought - well here's a good time to see if this raved about homemade cleaner actually works.
And guess what?
It sure does!
I have saved myself quite a few dollars by not taking the jewelry to the jewelers.
And the homemade cleaner has basic pantry ingredients in it too.

So here's how it rolled.....
 
Take one lot of tarnished black silver earrings and brooches...

Place them in a metal baking pan that has been lined with foil  (shiny side UP)

Pre mix - 1 cup of boiling water, 1 tablespoon of salt and  1 1/2 Tablespoons Baking Soda
Stir until dissolved and pour over the jewelry in the pan.
Pour over this 1/2 cup white vinegar.
It will froth up!
Next move the jewelry around a bit and the leave it sitting for 15 minutes.
A couple of pieces were really black, so I used a little brush to brush the black off.
Rinse under warm water and pat dry with a paper towel.

You now will have super shiny silver with no tarnishing.


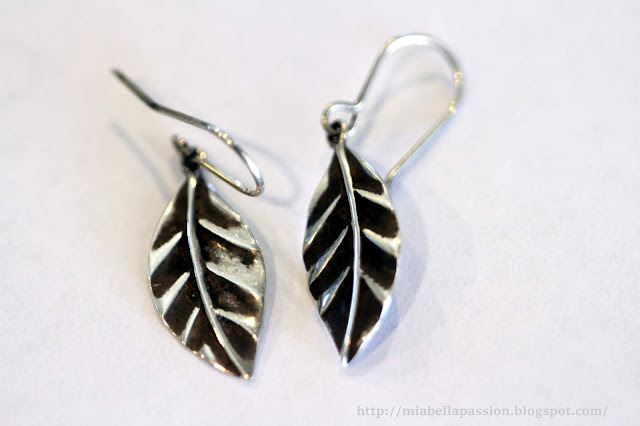
Here's a before and a after photo of these leaf earrings.
I really could not believe how good this worked.
jewelry cleaner
I'll definitely be using this homemade cleaner again!
It even cleaned up the fucshia earrings which are silver on copper.
I am so happy that I will now be able to wear these pieces again.


#homemade #tips # jewelry #cleaning


You might like to also visit:
My store at Fine Art AmericaRedbubble   :)


LOLA The Rescue Kitty... Her Story❥


Lola is a rescued kitty...
late January on one of our summers hottest days George the dog alerted me to this almost lifeless teeny tiny kitten on my driveway.
Some cruel person had dumped her on the roadside,
 and she had crawled into my gateway.
She was so little.
A mere 300 grams in weight and about 4 weeks old.


This is a pic from the moment I found her.
And Arabella inspecting the new arrival.
 I syringe feed her diluted milk,
it was touch and go but she made it through the night.
I managed to get some baby animal formula the next day, 
and the four hourly feeding began.
Within four days she had grown to 351 grams.
(And I was in love.)
She learnt to play.
 
And slept a lot!
After losing my little white dog in October last year I thought I would not or could not love another...
But how wrong was I.
 Little Lola became known as 'Lola Lollipop'.

The most adorable, loving wee cat.

Who learnt from a young age that technology is FUN!


And here she is now 6 months old -  beautiful, healthy, and very loved.


You might like to also visit:
My Fine Art America store at Webshop  :)


❥ Update that pot with a PLAIT!

I have added a little cosy fashion hip to this old planter with a plaited wool design...
For those who are wondering what a plait is, it's also called a braid.
Why don't you DIY one too?

You will need:
 a pot
Chunky weight acrylic wool in your choice of colour
(I used Craft wise wool from The Warehouse)
A glue gun and glue sticks
Scissors


The first step was to measure six three-and-a-half metres (about 11.5 feet) lengths of wool.
The wool lengths will vary on pot size, 
but this amount was ample for the pot I used which was 13 x 15cm  (about 5 by 11 inches) round.


The plait was made with 6 lengths of wool to give added thickness.
Knot one end and proceed to make a flat plait.

As you can see from the first photo, I initially thought to use a terracotta-style pot, but as I was plaiting thought - I would have to seal it to stop moisture from leaching into the wool.  So I changed it to a white plastic pot of a similar size, where this won't be an issue.  
This pot has no drainage hole and the plant sits inside it in another pot.

Once you have a decent length of plait, begin at the top of the pot with the tassel end from the start (tassel facing down) and glue it in place and around the rim of the pot.

Once you get to the tassel, drop the plait down and under it leaving a space to add another tassel later.

Continue to glue and plait more if required.
Once at the bottom cut the plait and quickly using a glue gun glue the end into position.

Now make another tassel which is a looped knot using the 6 strands of wool.
Glue the second tassel into place at the top of the pot.

Place your plant of choice inside.
I popped a miniature white flowering cyclamen in mine.


Grab a cuppa, and visit

 my Fine Art America gift store


#diyplanter #potplants #woolcraft


Related Posts Plugin for WordPress, Blogger...