Showing posts with label Porch & Patio. Show all posts

DIY Crayon Dripped Candle Holder...


When we were children we made all the gifts we gave for birthdays and Christmas...
This drippy crayon candle was a popular one to make and gift.
So I thought it was a whole lot of fun,
 and a great memory instigator to craft one for my middle deck makeover.

It looks fabulous on the old mosaic table.

To make:
You will need an old bottle with a neck to fit a candle.
(I used a wine bottle)
Some crayons in your chosen colours.
Matches or a lighter.
Newspaper to protect your work surface.
And two large stick candles.

Place one stick candle in the neck of the bottle.

Peel the paper off the crayons.

Light the second candle.
And place the crayon in the flame.  

Drip down the neck of the candle in the bottle and on to the bottle.
Drip your crayons until you have your desired effect.

DIY Candle Holder
Place on your outdoor table.
Enjoy the ambient candlelight when alfresco dining.


#diy #crafts #candles 


Side Deck Makeover Reveal...

There were two things to finish before the reveal...
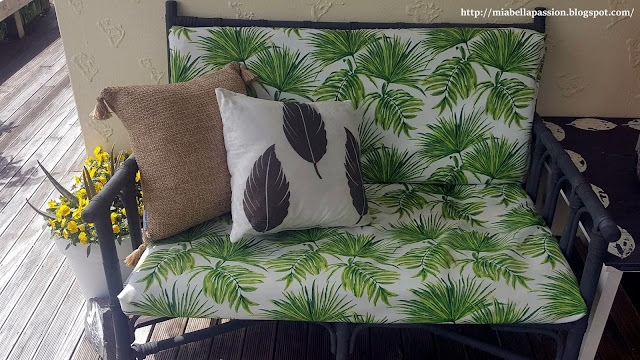
That was to refurbish both the cane two-seater couch,
And the outdoor dining table and chairs.
To refurb the two-seater cane couch...
Chalk Paint
I painted this in the same colour as the deck side table top in chalk paint.
Graphite.


Outdoor Fabric
The fabric was bought on sale from Spotlight New Zealand.
It is a waterproof - easy wipe canvas.  
Cheap as chips and perfect for seat cushion covers.

Patio Decor
I made an envelope style cover for the seat squabs.
Mainly because this makes the covers really easy to remove for washing.

Patio Decor
Envelope cushion covers are easy to make.
Just Google search envelope cushion covers and you'll find the instructions.
It's the same concept but on a bigger scale for couch squabs.


Stenciling
The side table was a previous blog makeover...
You can read about the process and stencilling HERE.


To refurb the outdoor dining table and chairs which were cracked and sunbleached,
I used the same colour combination in Chalk paint. 


These were so in need of a refurb...
just look at this chair!

Upcycled Furniture
Graphite for the top, and old white for the legs for the table,
and Graphite for the chairs.
The same outdoor canvas with palm leaf print used to cover couch squabs was used to recover the chair seat pads.


The wood parts have been waxed to help protect from the weather that sometimes gets in under this roof only, two sides open to the elements deck.
I love adding plants to dress the deck,
these are the new white pots. 

These pots are plastic and are just $15 from Kmart!
I have gone crazy over these pots as they look expensive,
 are top quality, plus they are light so easy to move around.
There is an Aloe Vera plant hiding in amongst all those pretty yellow violas.
I also added existing decor pieces to the makeover 
- like this mosaic stingray that my son made when he was a child.


As well as this chippy iron hanger.
The anchor artwork is a previous blog creation.
You can find out how to make it HERE.


This enamel candle holder was in Briscoes sale

-  marked down from $69.99 to just $15!.


And two baskets - for balls, cushions and throws for summer use.

Viola
The plants in this pot are Viola 'Penny Yellow'.
And Mother in laws tongue (Sansevieria). 
Viola Penny Yellow and White are my go-to annuals for my pots this year.
They are so hardy flowering continuously!

You can find out how to make the DIY pallet anchor art HERE

The side deck makeover was long overdue.
It's fresh and pretty.
It's practical and usable.
And with summer coming I can't wait to eat alfresco out here
and create wonderful family memories!


#diy #deck #patio #outdoordining #outdoorliving #patiodecor #pottedplants #reburshish #furnituremakeover


It's All About Lavender....

This weeks post is a garden one...
because it's chaotic here at Mia Bella Passions homestead at the moment!
It's school holidays - so we have the added addition of little Miss Three and Master almost Seven!
PLUS three builders installing new double glazing in the living end of the house.
Add to the mix three very stressed out cats!
Because of all those happenings, I just didn't get my planned DIY completed...

Lavender
So this weeks post is about a new plant.

Lavender
A lavender.

Lavender
It's called 'Lavender Avonview'.
Purchased to replace the Dutch Iris bulbs that have finished their Spring flowering in the office deck pot.
(Time to plant them out in the garden bed for next years flowering).
So in their place is now a Lavender'.
It is BEAUTIFUL.

Lavender
'Lavender Avonview'
or Lavandula stoechas 'Avonview' 
is a smaller growing lavender.
Perfect for the container...
and also garden beds and rockeries.
It is said to be a wonderful low hedge.
I've added a few purple petunias annuals to the pot too.
They will add to the 'pretty' when they flower and drape over the sides.

Lavender
Compact but vigorous, this lavender thrives in sunny positions with well-drained soil.
Plus it tolerates coastal conditions and short periods of dryness once it is established.
Trimming after flowering helps maintain shape and more flowers!

Lavender
I'm loving the shape, form and perfume of this lavender.
Its height is just 80cm by 80cm so it's perfect for my office deck pot.
The bonus is the bees LOVE it too!


#lavender #deckplants #patioplants #scentedplants


Deck Side Table Makeover!

It's Spring in New Zealand!
HOORAY!
And doesn't that wonderful warm sunshine kick you into Spring mode in a hurry.
Well it certainly has me.
The project this week was to update and refresh the little side deck table.

DIY
The old side table was actually beyond sad -
with the mosaic tiling lifting and even missing in places.
This wee table was built 20 years ago so it really has done well.
Once fixed I'm sure it will last many more years.
It was certainly time for some TLC and paint!

I removed the old mosaic.
Then replaced the wooden top with new.

I painted it with Annie Sloane chalk paint.


The colours used were: 
Graphite for the top.
Old White for the legs.
(I painted the old cane two seater couch too!)

Then stenciled leaf prints.

 
I used a real leaf to do this.
The rubber plant leaf is perfect as it is waxy and strong.

leaf stencil
One leaf stenciled the whole table.
The next day once the paint was dry I waxed it to protect it from the elements.
Even though this deck is covered by a roof, 
the elements sometimes get in via the open sides,
 and the wax will hopefully give some protection to the wind blown rain.

leaf prints
Doesn't it look fab?
Leaf stenciling has a real rustic effect, and I love that.
A perfect fit with chalk paint too.
And even though I was sad to see the mosaic go, 
I adore this little side table refurbishment,
it was time for something different.
Now I'm inspired to makeover the entire side deck...
That two seater cane couch is next on the list! 


#diy #refurbish #chalkpaint #leaf #stencil #stenciling #printing #upcycle #paint


SUPER EASY DIY Starfish Wreath...❥

DIY Wreath
It is still officially Winter in New Zealand but I have SPRING fever already!
Maybe that's because this has been a very mild winter,
and the days that are fine seem to be long and sun-filled with little wind at all.
I live in a smaller town, not a city,
so for me, online shopping is so convenient for my favourite city stores.
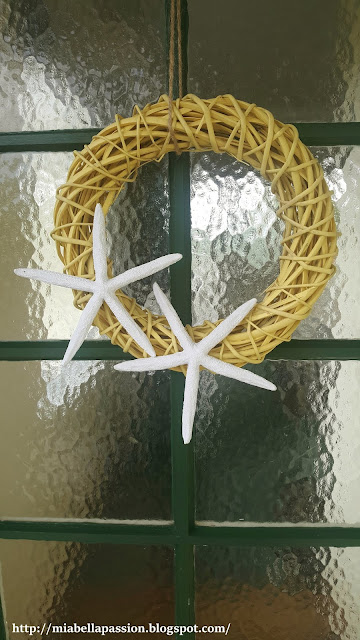
And the 2 things that it took to make this very simple wreath, 
 were bought that way via Spotlight Online NZ.

The plain cane 30-centimetre wreath was $16.99
and the pack of three starfish were $10.49.

I already had the spray paint in my paint stash (do you have a paint stash?)
but my go to spray paint is as I have said before (because of coverage and no clog nozzles), is Rust-Oleum Universal Paint and primer in one.
The colour I have used is Matte Citron.

So to make this beach inspired wreath:
Cut off the hanger.
Spray paint the wreath on one side making sure of even colour coverage.
Leave 20 minutes.
'Turn and Spray the other side.
Leave the wreath to dry another hour or overnight.


DIY Wreath
Hot glue on the starfish (I used two)


DIY Wreath
Put the jute string hanger back onto the wreath.
Hang on the Front door using a command hook
 or a small screw-in hook if you have a wood door like me.
How SUPER EASY is that??

DIY Wreath
Now I have a cute beach-inspired wreath for my Front Door.
Popping with gorgeous sunny yellow...
Now I am inspired to refresh the rest of my Front Porch
 - so watch this space for more!


#easydiy #diy #diywreaths #beachinspired #beachy #craft #Beachwreath #starfish


KUMERA - The Easiest Pot Plant To Grow! ❥

As I was chopping my kumara (sweet potato) up for dinner,
I was looking at the sprouting ends and thought,
how fun would it be to grow them, just like we did as kids!
Kumera must be the easiest pot plant to grow.
All you need is a sprouting end.

As you can see this one already has some tiny little leaves forming.

 I sat the ends in a little dish of water,
 and placed it on the sunny end of my kitchen bench.

The leaves started greening up,
roots began to grow.

After one week this is what you have.
Lots of leaves and a whole lot more green.
It's time to plant! 

I bought this hanging basket which is 35cm in size from Bunnings.
Fill the basket with potting mix.

 Place the kumara on top of the mix.


 Cover with more  potting mix.


For an extra pop of colour, I planted impatiens in the basket too.

After a week your plant is furling around...

Grow in the summer with or without complementary plants, 
 and you will have a fabulous green twirl of heart shaped leaves.
Eventually the vine type runners will hang down, but do bush up the growth a little by snipping the vine ends once the desired length.
 It will put on a show for the entire summer if watered regularly.


#nzbloggers #sweetpotato #potplant #hangingbaskets #deck #porchdecor


Related Posts Plugin for WordPress, Blogger...