Felt Reindeer Christmas Decorations...


Here's another little cutie felt project for ya all.
A 'Felt Reindeer Christmas Decoration'....
I made  a whole lot of these darlings for the main Christmas tree ornaments a few years ago.

This is a slightly modified version, 
as the first were hand stitched, and had separate ears.

To make:
Copy & paste the template to your computer and print.
Cut out the antlers and reindeer templates.

Choose felt in the colours of your choice.
Pin to felt that has been folded in half as you need two antlers and two reindeers per ornament.

Using a sewing machine:
Stitch the two antlers together using a contrasting colour thread.

Do the same with the reindeer but leave a gap to insert stuffing on the under tummy.

Stuff using a chopstick to push into small areas.
Stitch up the gap.

Add a sequin nose.

Handstitch antlers in place.

Two bead eyes.


A ribbon bow or bell at the neck.
Add a hanger.

Hang on tree.


#christmas #felt #crafts #sewing #ornament


Painted Carafe & Christmas Berries...

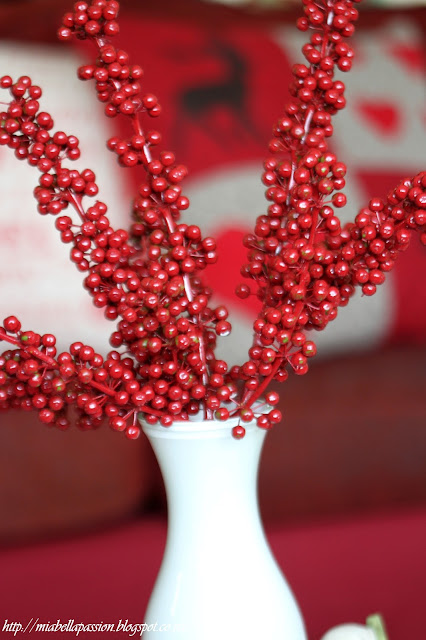
Carafe vases are a nice shape and perfect for arrangements of Christmas lillies and berries.
My clear glass carafe vase needed a bit of oomph for Christmas,
so out came the white paint.

All I did was pour a little paint inside and slowly swirled it around the vase until the inside was completely coated.

The paint I used was Dulux Aquanamel in white,
 because it is water resistant, and a lovely thick paint.  
This makes the coating of the glass exceptionally easy.

It took 5 minutes from start to finish for this glass painting project.

As I have already shared, here in New Zealand it is summer.
Which means no winter berries!
At the moment I have one Ilex 'Holly' shrub in berry
but the berries won't be red until Autumn.
So what does one do when one must have red berries?
Get out the spray paint of course!


Before painting I stripped the leaves off the stems.
then spray painted them.

After 24 hours drying and fume release time,
place into the vase.
I haven't put water into the vase.
 as the spray paint seals the berries with a thick coating of paint, and preserves them.

Red berries and a white vase to match the Christmas themed cushions.

Place vase on a coffee table, mantel or sideboard,
for a little bit of berry red and white fun.


#Christmas #crafts #berries #red #painted


Cute Scottie Dog Ornament...

This scottie dog ornament is 'OH SO CUTE'!

It's a simple hand stitched ornament that is basic enough for the older kids to create for the Christmas tree.
And a pretty neat gift for those little white dog lovers.
You will need:
A template printed
White felt
Thin wadding
embroidery cotton in the colour of your choice.
an embroidery needle
scissors.

Save as and print the template.
Choose the size you like.
Cut it out.

Place on felt that has been folded in half with the wadding as the middle layer.

Pin template onto the felt layers 

Cut it out.

Hand stitch around the outer edge...
 using embroidery cotton.

Stitch on a bead eye.

Add a little bell at the bottom of the neck.

Then stitch back up to top of the neck as shown.

Add a ribbon hanger.

And a nose -
I used a rose embellishment.

Now is this wee scottie cute? 
Or the cutest?


#felt #craft #handstitched #christmas #ornament #diy


Faux Rust Meets Christmas!


There are a few tricks on creating faux rust on objects,
but this one is probably the easiest!

To make faux rust Christmas letters:

you need pre painted white wood letters.

White craft glue or mod podge.
Ground cloves and cinnamon.

On a newspaper covered table, use a paint brush to spread the glue on to each letter one by one. 
Sprinkle/ or sieve over the cinnamon.
Add more glue is needed to throw on pinches of cloves..
The cloves is darker than the cinnamon so it gives a nice rust worn patina.

I created a rusty 'HOHO' 
How cool is that?
The bonus is all that cinnamon and cloves is
making my sitting room smell 'Oh so much like Christmas'!
Divine!


#christmas #craft #letters #cinnamon


Gift Idea - Bead Suncatcher...


If you love the joy of gifting handcrafts, then this one is for you.
Grandma would adore it - ((gift idea ;) ))
Or...
You can make them in festive colours 
hung individually use them to decorate your tree.
Either way - the bead suncatchers are simply FUN!

NOTE:
So this is where I will be honest with ya all.
This project was a near Pinterest FAIL!
This is what I discovered:

Don't buy pearl coated beads because they don't melt - your shape will disintegrate as you take it out of the mould.
Use a mould with a simple shape - hearts and circles are best.
Use a single layer of beads.
Some plastic beads melt together fabulously - others don't.
The clear glue backing method fixes this and makes the suncatcher stronger.
So now I have solved all these issues for ya all...
I can happily say 'It's a fun activity to do with the kids'.


You will need:
Plastic beads from the Dollar or craft store.
Old cookie cutter moulds.
Baking paper lined tray 
A skewer
Thick clear glue -(I used craft glue)
A piece of ribbon

To Make:
Preheat the oven to 200 degrees celsius (400F)
Place cookie cutters onto the tray
Pour a single layer of beads in the cookie cutter.
Place into oven
Bake for 10 minutes.
Remove from oven.
Cool slightly.
Use skewer to poke edge to remove from the cutter shape.
When cold:
Spread a layer of clear glue on the back of each shape.
Run the ribbon hanger to join each shape.
 Leave 24 hours to set.
Hang, wrap and gift for Christmas...
Or hang on your tree.


How To Make Bows...

With Christmas on it's way it's time to learn how to make bows!
It's the the season for bows, because you need -
Bows for trees...
Bows for gifts...
Bows for wreaths...
Bows for the decor...
Today I am sharing links to a variety of bow making tutorials that offer you clear, step by step instructions.
So lets get bow making!


The 'Simple Burlap Tree' Bow
Via Me ;) 
Instructions HERE

Really easy, beautiful way to tie a gift bow for Christmas presents!
The 'Tulle Fluff' Bow
via Lamberts Lately
Photographic tutorial HERE.

DIY: How to Tie a Loopy Bow
The 'Loopy' Bow
(Great for Wreaths!)
Instructions via 'Save On Crafts' HERE.

Giftology: How to Make a Bow out of Ribbon
The 'Fancy' Ribbon Bow
video instruction via Hallmark & Giftology HERE.

The 'Paper' Bow
Via Charlets Website
The pattern and instructions are HERE.

Thanks to Duncan Hines for sponsoring my writing. There's no limit to the baking possibilities, so grab your favorite Duncan Hines mix and Comstock or Wilderness fruit fillings and Bake On! www.duncanhines.com. _______________________ Now is the perfect time of year...:
'Paper Curls' Bow
via source.


The 'Simple' Bow
Instruction video HERE.

How to Make a Paper Bow
The 'Peg & Label' Paper Bow
via ellinee.com
Instruction & templates HERE.


#bows #howto


The Only Thing...

Gosh this year has flown.
The christmas countdown is almost here...
and this quote will be the last for 2016.
That's because at Mia Bella Passions over the coming month 
- you guessed it - 
it will be all about Christmas.
I have saved the best for last...
well I think so anyway.
This quote is my 'absolute all time fav'.
It is so romantic and it's so me.


The only thing I am guilty of is loving in floods not raindrops.

Words shared with a beautiful raindrops on flowers image.

Enjoy.


Related Posts Plugin for WordPress, Blogger...