Mia Bella House Tour - The French Masculine Bedroom...

The French Masculine Bedroom consists of neutral earthy tones...
with a pop of black.
The drapes are pulled back with brass and rope curtain tiebacks.
Find out how to DIY make them HERE.
For the DIY photographic tutorial on how to make them, click here:
Wall art is an original vintage etching and a Paris graphic that have been framed in black.
The furniture has been left natural wood to compliment the wooden skirting and door frames. 
The large basket is to collect the clothing that would normally be left on the floor.  
(And it works a treat - training does not take long to complete!)
The dado rail in the ensuite is also oiled wood,
and guess what?
The love of shells continues here as it does in the 'Blue Bathroom'!
There is a bit of a original beachy artwork on the wall too.
The duvet was found at Briscoes...
I love the pin-tuck effect.
The crown cushion in natural linen and black is from Wallace Cotton.
The quilt is also from Wallace Cotton.
The leaf print is very masculine.
Here's the link to their online store: Wallace Cotton Online
The bedside table displays the flying pig,
a black metal crown, filigree metalwork ball,
 and...
a huge crystal rock.
Note how Mr Pig is sitting on a few vintage books.
This is referred to as displaying using a riser.

The other bedside table has a basket to hold all the 'bloke' bits...
A stylish basket is the perfect solution to bloke mess!
I'm loving the open weave and the cool metal handle.
Above each bedside table are some framed images...
You'll find these FREE photographs here:
On the antique tallboy sits a moth orchid in a bowl.
The knick knacks are items collected on holidays to Bali and Fiji and continue the natural wood, stone and black theme.
Moth orchids are a favourite of mine.
Especially the white ones!
The centre of the flowers look like angelic doves....
So beautiful!
To make your own orchid bowl,
click here for the tutorial: DIY Moth Orchid Bowl
Arabella enjoys the afternoon sun in the French masculine bedroom.
It's a room with subtle colouring,
 but I think the black accents and natural wood gives it wow factor!


#masculinebedroom #masculinedecor 

DIY Bottle terrarium...

A terrarium is an interesting focal for on a shelf,
and as it was time for 'something different', and a rearranging session on my bookshelf, 
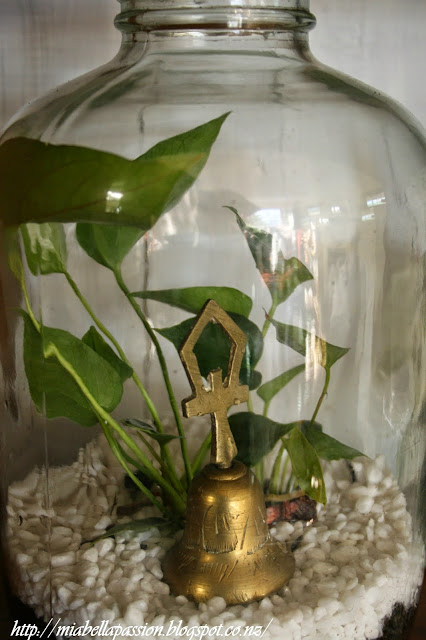
I created this DIY Bottle terrarium...
DIY terrarium
You will need:
DIY terrarium
 a large clean bottle or container made from clear glass
Some potting mix
Bark (I used orchid bark)
Fine white stones or gravel
A plant
 An interest item like an ornament, a rock, or a crystal.  
(I used an old brass bell that was my Grandfathers.)
2 x thin sticks.
Piece of wire. 
DIY terrarium
My plant (a miniature anthurium) was too big,  
  so I broke it up. 
I actually got six plants from this one, and used three pieces for in the terrarium.
The flowering part of the plant was re-potted back into the original white container.
The other two pieces added to a hanging basket on the back porch.
Don't you love it when one plant turns into many?
DIY terrarium
Firstly put a layer of bark in the bottom of the bottle,
then add a layer of potting mix.
DIY terrarium
Use the stick to make a hole in the middle. Place your plant here.
Use the sticks to manipulate the plant into position and to push the soil around the roots.
Water lightly.
DIY terrarium
 Now add a layer of white stones or gravel.
Once again use the sticks to move the stones into place.
DIY terrarium
 Finally add your interest piece.
Use the wire with a hook bent on the end to place the interest item in the bottom.
DIY terrarium
 Finished and in place on the shelf...
DIY terrarium
The DIY Terrarium most certainly adds interest to the shelf display.
I love the way it compliments my old bottle collection.

#terrarium #diyterrarium 


DIY Anchor Pallet Artwork...

Pallet everything is so on trend at the moment!
 So here's my take on a pallet anchor picture...
It's a step by step photographic tutorial,
so gather your supplies and join in the fun!

You will need:
 Four pieces of pallet each cut to 45cm long,
plus two small offcuts to use as a backing.
The pallet pieces should be pre painted.  
I used white paint, but you can choose any colour you'd like.
Set the four pallet pieces tightly together, painted side face down,
 then place the backing wood as shown. 
 Nail the backing boards in place.  This stablilises the pallets and holds them in place.

 Print the free anchor template from here:

Use this as a guide to free hand draw the anchor onto the wood. Or enlarge the template slightly, cut out, and use as a template to draw the outline.

 Choose your paint colour (mines charcoal grey) and paint the anchor.
 I have seen this done with a coloured backing board and a white anchor, 
which is also really effective.
 Set aside to dry.
 When dry, add some highlights in silver or gold - whichever suits your colour choices.
When dry, seal with a coat of clear matt sealer.
 Attach a hanger.
I've used some rusty chain, but you could use chunky rope.
Hang and enjoy.
The DIY Anchor Pallet Artwork - a little rustic nautical fun!


#anchorcraft

Related Posts Plugin for WordPress, Blogger...