Fearless and Fab...

New design - 'Fearless'.

Online Shopping

A magnificent stag with a subtle floral background and overlay. Digital artwork that combines my original oil painting and photography.
The design is available in a range of products and its in four colours
- purple, blue, orange and pink.
The fearless design comes in a huge range of products.

Christmas is coming up fast - so check out my products range Redbubble shop HERE.

Online Shopping
And for 'Fearless' Purple - HERE

Online Shopping
'Fearless' Blue - HERE

Online Shopping
'Fearless' - Orange - HERE
and

Online Shopping
'Fearless' Pink - SOLD OUT


Side Deck Makeover Reveal...

There were two things to finish before the reveal...
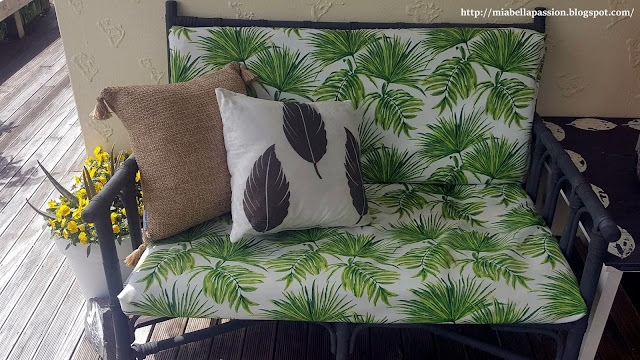
That was to refurbish both the cane two-seater couch,
And the outdoor dining table and chairs.
To refurb the two-seater cane couch...
Chalk Paint
I painted this in the same colour as the deck side table top in chalk paint.
Graphite.


Outdoor Fabric
The fabric was bought on sale from Spotlight New Zealand.
It is a waterproof - easy wipe canvas.  
Cheap as chips and perfect for seat cushion covers.

Patio Decor
I made an envelope style cover for the seat squabs.
Mainly because this makes the covers really easy to remove for washing.

Patio Decor
Envelope cushion covers are easy to make.
Just Google search envelope cushion covers and you'll find the instructions.
It's the same concept but on a bigger scale for couch squabs.


Stenciling
The side table was a previous blog makeover...
You can read about the process and stencilling HERE.


To refurb the outdoor dining table and chairs which were cracked and sunbleached,
I used the same colour combination in Chalk paint. 


These were so in need of a refurb...
just look at this chair!

Upcycled Furniture
Graphite for the top, and old white for the legs for the table,
and Graphite for the chairs.
The same outdoor canvas with palm leaf print used to cover couch squabs was used to recover the chair seat pads.


The wood parts have been waxed to help protect from the weather that sometimes gets in under this roof only, two sides open to the elements deck.
I love adding plants to dress the deck,
these are the new white pots. 

These pots are plastic and are just $15 from Kmart!
I have gone crazy over these pots as they look expensive,
 are top quality, plus they are light so easy to move around.
There is an Aloe Vera plant hiding in amongst all those pretty yellow violas.
I also added existing decor pieces to the makeover 
- like this mosaic stingray that my son made when he was a child.


As well as this chippy iron hanger.
The anchor artwork is a previous blog creation.
You can find out how to make it HERE.


This enamel candle holder was in Briscoes sale

-  marked down from $69.99 to just $15!.


And two baskets - for balls, cushions and throws for summer use.

Viola
The plants in this pot are Viola 'Penny Yellow'.
And Mother in laws tongue (Sansevieria). 
Viola Penny Yellow and White are my go-to annuals for my pots this year.
They are so hardy flowering continuously!

You can find out how to make the DIY pallet anchor art HERE

The side deck makeover was long overdue.
It's fresh and pretty.
It's practical and usable.
And with summer coming I can't wait to eat alfresco out here
and create wonderful family memories!


#diy #deck #patio #outdoordining #outdoorliving #patiodecor #pottedplants #reburshish #furnituremakeover


It's All About Lavender....

This weeks post is a garden one...
because it's chaotic here at Mia Bella Passions homestead at the moment!
It's school holidays - so we have the added addition of little Miss Three and Master almost Seven!
PLUS three builders installing new double glazing in the living end of the house.
Add to the mix three very stressed out cats!
Because of all those happenings, I just didn't get my planned DIY completed...

Lavender
So this weeks post is about a new plant.

Lavender
A lavender.

Lavender
It's called 'Lavender Avonview'.
Purchased to replace the Dutch Iris bulbs that have finished their Spring flowering in the office deck pot.
(Time to plant them out in the garden bed for next years flowering).
So in their place is now a Lavender'.
It is BEAUTIFUL.

Lavender
'Lavender Avonview'
or Lavandula stoechas 'Avonview' 
is a smaller growing lavender.
Perfect for the container...
and also garden beds and rockeries.
It is said to be a wonderful low hedge.
I've added a few purple petunias annuals to the pot too.
They will add to the 'pretty' when they flower and drape over the sides.

Lavender
Compact but vigorous, this lavender thrives in sunny positions with well-drained soil.
Plus it tolerates coastal conditions and short periods of dryness once it is established.
Trimming after flowering helps maintain shape and more flowers!

Lavender
I'm loving the shape, form and perfume of this lavender.
Its height is just 80cm by 80cm so it's perfect for my office deck pot.
The bonus is the bees LOVE it too!


#lavender #deckplants #patioplants #scentedplants


FREE Photograph - to print, gift or share...

Today I am gifting a free photograph to y'all!
This is a shot of a beautiful flower bud.
I have NO IDEA what this flower is...
other than it is a bulb that has two big strappy leaves.
The buds are glorious and then they turn into individual drop pendulums.
The colour changes from this purple-pink to a musky rose colour as it ages.
So if you know what this flower is - please tell me via the comments.

Anyway here it is:
Free Printable
And as the title says - you may print to frame.
Gift it.
Or use as a screensaver.
And I know that you will only do this for your own personal use.
(Commercial use for profit is forbidden!)

BUT the true story behind this photograph is...
It won an AWARD.
For digital photography in an international competition.
I'm really proud of that.
And with Christmas coming -
 perhaps someone you love,
 would enjoy this beauty framed and gifted to them.

Or if you might like to check out my image gallery at Fine Art America
for other great Christmas Gift ideas:
you'll find it HERE.


#freeprintable #photography #flora #beautiful


Peanut Butter Chocolate Chip Snack Balls....❥

There are times when I try to be healthier,
 and try to reign in my obsessive compulsive chocolate addiction.
The trend of health lovers of late is to snack on smooze type health balls...
super healthy little darlings which are made with a date base.
But here's the thing peeps....
I loathe dates.
They are most definitely my most unfavourite flavour.
So I decided to create a snack ball that was more my style...
They are not the healthiest.... 
because apparently dates are healthier!
But my choice is either four chocolate biscuits with my coffee break,
 or two Peanut Butter Chocolate Chip Snack balls.

I figure the snack balls are the healthy winner.
And I REALLY REALLY find them delish.

They last up to two weeks in a sealed container in the fridge.
You'll get about 30 balls.

All you do is mix up in cake mixer or food processor to combine:

1 x 375g Jar peanut butter - crunchy - no added salt.
1/4 cup fine coconut
1/2 cup of dark chocolate chips
And 2 cups fine oats.
Use clean hands shape into balls and place them on tray.
If you wet your hands a little it is easier to shape them.
Place tray in refrigerator for balls to firm for a few hours.

Then transfer to a sealed container.

They tick all the right boxes for my kind of healthy!
Peanut Butter Chocolate Chip Snack Balls are little bites of blissful joy!


#snackballs #peanutbutter #healthy #treats #snacks


Deck Side Table Makeover!

It's Spring in New Zealand!
HOORAY!
And doesn't that wonderful warm sunshine kick you into Spring mode in a hurry.
Well it certainly has me.
The project this week was to update and refresh the little side deck table.

DIY
The old side table was actually beyond sad -
with the mosaic tiling lifting and even missing in places.
This wee table was built 20 years ago so it really has done well.
Once fixed I'm sure it will last many more years.
It was certainly time for some TLC and paint!

I removed the old mosaic.
Then replaced the wooden top with new.

I painted it with Annie Sloane chalk paint.


The colours used were: 
Graphite for the top.
Old White for the legs.
(I painted the old cane two seater couch too!)

Then stenciled leaf prints.

 
I used a real leaf to do this.
The rubber plant leaf is perfect as it is waxy and strong.

leaf stencil
One leaf stenciled the whole table.
The next day once the paint was dry I waxed it to protect it from the elements.
Even though this deck is covered by a roof, 
the elements sometimes get in via the open sides,
 and the wax will hopefully give some protection to the wind blown rain.

leaf prints
Doesn't it look fab?
Leaf stenciling has a real rustic effect, and I love that.
A perfect fit with chalk paint too.
And even though I was sad to see the mosaic go, 
I adore this little side table refurbishment,
it was time for something different.
Now I'm inspired to makeover the entire side deck...
That two seater cane couch is next on the list! 


#diy #refurbish #chalkpaint #leaf #stencil #stenciling #printing #upcycle #paint


Elevate Yourself...

Elevate yourself to a place 
where you can see the beauty of life...
a new photo quote by TLee.
Feel free to share.
:)


#rose #flower #photography #flora #quotestoliveby #lifequote #quotes #mindsetmatters


Quick 'n' Easy Halloween Fabric Pumpkins...

Halloween
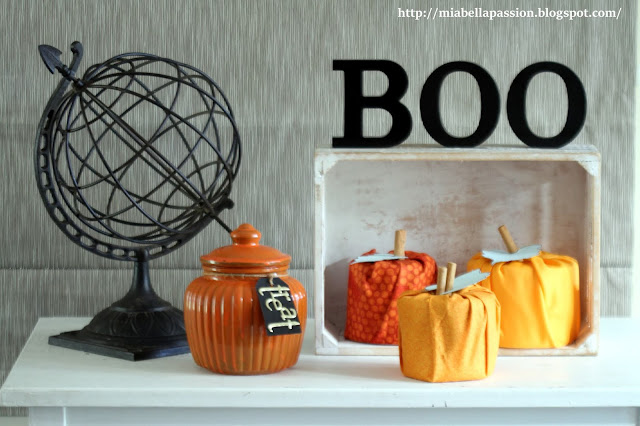
This years Halloween display was kept simple,
 as I simply did not have time to create anything elaborate.

Halloween
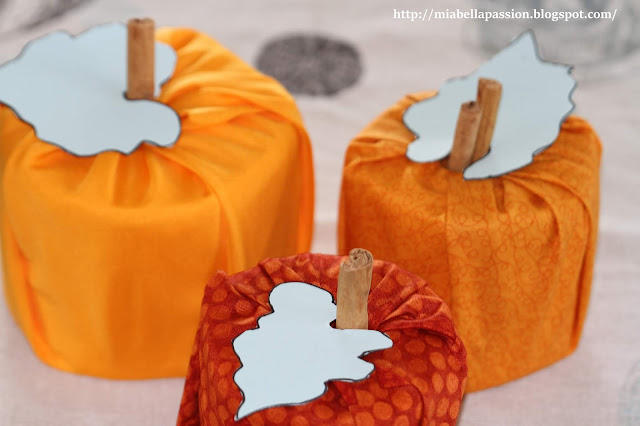
I had seen these fabric pumpkins using a toilet roll as the base so decided that fitted the quick 'n' easy criteria.
To make them, all you need is:
Toilet rolls  ( I used two different sizes - one large - two usual size).

Fabric cut to 55cm x 43 centimetres
(the chiffon fabric was doubled as it is see through)
Cinnamon Stick for the stems.
Card leaves 
(I free hand drew these but the are many options to print on the net, just google 'pumpkin leaves to print)

To Make:

 
Centre the toilet roll on the fabric and tuck the fabric into hole.

Then add a cinnamon stick for the stem.
(Lola thought these smelt so good!)

Cut out your hand drawn or internet sourced printed leaves. 

Halloween
Add to the cinnamon stick stem.

Halloween
Place in your Halloween display.

The Treat jar was made last year.
If you want to know how to make it visit HERE.

MORE HALLOWEEN IDEAS & PRINTABLES HERE

#halloween #diypumpkins #fabricpumpkins #halloweendisplay


Related Posts Plugin for WordPress, Blogger...